Mastering the Mirror Modifier in Blender
2026-10-01
If you have ever tried to model a character's face, a car, or a butterfly by hand, you already know the pain: build one wing, then build the exact same wing again on the other side — perfectly. One misplaced vertex and the whole thing looks lopsided.
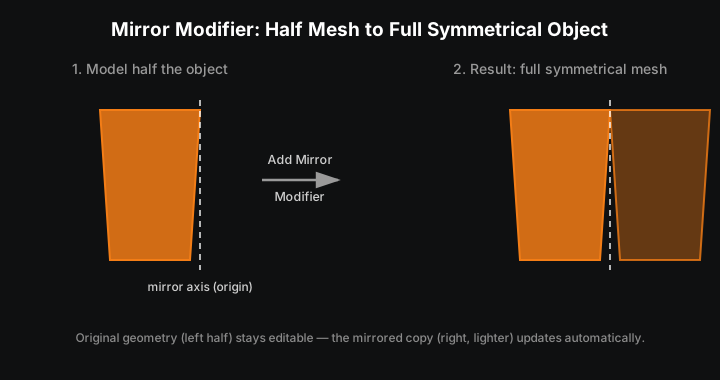
Blender's Mirror Modifier removes that problem entirely. You model half an object, and Blender generates a perfect mirrored copy in real time. Both sides stay identical because there is only ever one side being edited.
It is one of the first modifiers worth learning properly, and it will save you hours on nearly every symmetrical thing you ever build.
What a Modifier Actually Is
A modifier is a non-destructive operation stacked on top of your mesh. It changes how the object looks and behaves without touching the underlying geometry until you choose to make it permanent.
That word — non-destructive — is the whole value. You can turn it off, change the axis, or delete it, and your original half is exactly as you left it. Nothing is baked in until you say so.
The Mirror Modifier specifically:
- Duplicates your mesh across a chosen axis — X, Y, or Z
- Keeps the duplicate perfectly symmetrical at all times
- Updates live as you edit the original half
- Can weld the two halves together at the centre seam so there is no visible join
The Setup, Step by Step
1. Start with half an object
Delete the half you do not need. In Edit Mode:
- Select the vertices on one side — box select with
Bworks well from a front orthographic view (Numpad 1) - Press
Xand choose Vertices - You are left with exactly one half
2. Centre the object's origin
This is the step people skip, and it is the single most common reason the modifier "does not work".
The Mirror Modifier mirrors across the object's origin, not the centre of the mesh. If the origin is not sitting on the line you want to mirror across, the copy appears offset — sometimes wildly.
To fix it: place the 3D cursor where the mirror line should be (Shift + C snaps it to the world origin), then Object ▸ Set Origin ▸ Origin to 3D Cursor.
3. Add the modifier
Select the object, open the Properties Panel, click the wrench icon, then Add Modifier ▸ Generate ▸ Mirror. A mirrored copy appears immediately.
4. Pick the axis
It defaults to X. If the copy lands in the wrong place, toggle X, Y or Z in the modifier panel. You can enable more than one at once — useful for something radially symmetrical like a four-legged table.
5. Turn on Clipping
Tick Clipping. This stops vertices near the centre seam from crossing over to the other side while you work.
Without it, a vertex nudged slightly past the middle produces a hole, a pinch, or a strange overlapping flap right down the centre of your model. With it on, vertices at the seam are locked to the mirror plane and slide along it instead of through it.
One thing worth knowing: Clipping prevents vertices from crossing, but it only locks the ones already sitting on the seam. If you need to pull a seam vertex away from the middle deliberately, switch Clipping off, move it, and switch it back on.
6. Model as usual
Extrude, loop cut, sculpt, scale. Every change mirrors instantly. You only ever think about one half.
7. Apply it — when you are genuinely finished
Click the dropdown beside the modifier and choose Apply. Both halves merge into one real mesh.
Only do this when you are confident you will not need the symmetry again. After applying, the two sides are independent, and fixing one means fixing the other by hand.
The Three Settings That Actually Matter
Most of the Mirror Modifier panel can be left alone. These three earn their place.
| Setting | What it does | When you want it |
|---|---|---|
| Clipping | Locks seam vertices to the mirror plane | Almost always, while modelling |
| Merge + distance | Welds vertices within a threshold of the seam | On, so the halves join into one surface |
| Bisect | Cuts the mesh at the axis instead of mirroring the whole thing | When you did not delete half first |
Bisect is the one people do not discover for years. If you already modelled a whole object and then decided you want symmetry, you do not have to delete half manually — enable Bisect on the relevant axis and Blender cuts it for you. Flip next to it reverses which half is kept.
There is also a Mirror Object field. Leave it empty and the object mirrors around its own origin. Drop an Empty in there and it mirrors around that object instead — handy when the mirror line is not where the origin can reasonably live, such as a pair of wings on a body you do not want to re-origin.
Mistakes That Waste an Afternoon
The origin is not where you think it is. The number one cause of a copy appearing in the wrong place, at the wrong distance, or seemingly not at all. Check the origin before you check anything else.
Clipping was off while sculpting. You will find out later, when the seam shows a crack or a ridge that will not smooth out.
Applying too early. You lose the automatic symmetry and inherit twice the work.
The modifier order is wrong. Modifiers evaluate top to bottom. Mirror should sit above Subdivision Surface — if subdivision runs first, the seam gets smoothed before it is welded and you get a visible pinch down the middle.
Flipped normals on the mirrored half. If the copy looks dark or inside-out, the original half likely had inconsistent normals to begin with. Select all in Edit Mode and press Shift + N to recalculate.
Expecting it to help with UVs. It will not, and this surprises people. A mirrored mesh produces mirrored UVs that sit exactly on top of the originals. For a tiling or symmetrical texture this is free efficiency. For anything with text, logos, or asymmetric wear, you will need to separate the islands after applying — see UV unwrapping in Blender for what that involves.
Mirror Modifier or Sculpt Symmetry?
They are different tools and it is worth knowing which you want.
The Mirror Modifier generates geometry. Half your mesh genuinely does not exist until the modifier runs.
Sculpt Mode symmetry (the X/Y/Z toggles in the Sculpt header) does not generate anything — it mirrors your strokes across a whole mesh that already has both halves.
Use the modifier while blocking out and modelling. Use sculpt symmetry once you have applied it and are detailing a complete mesh.
Why It Is Worth the Ten Minutes
The Mirror Modifier turns symmetrical modelling from a tedious, error-prone chore into something you stop thinking about. Centre your origin, pick the axis, turn on Clipping — three habits, and you will reach for it on almost every character, vehicle and prop you ever build.
Next time you start something symmetrical, build one half first. The rest arrives for free.
Newsletter
Get more tips like this
Short, practical Blender guides for beginners — straight to your inbox. No spam. Unsubscribe any time.