UV Unwrapping in Blender, Without the Panic
2026-08-15
Modelling clicks eventually. Materials sort of click. Then you try to put an image texture on your model, it comes out smeared into unrecognisable streaks, and you discover UV unwrapping.
This is the wall. More beginners stall here than anywhere else in Blender, and it's almost always because nobody explained what the process is actually for.
📦 What UVs Actually Are
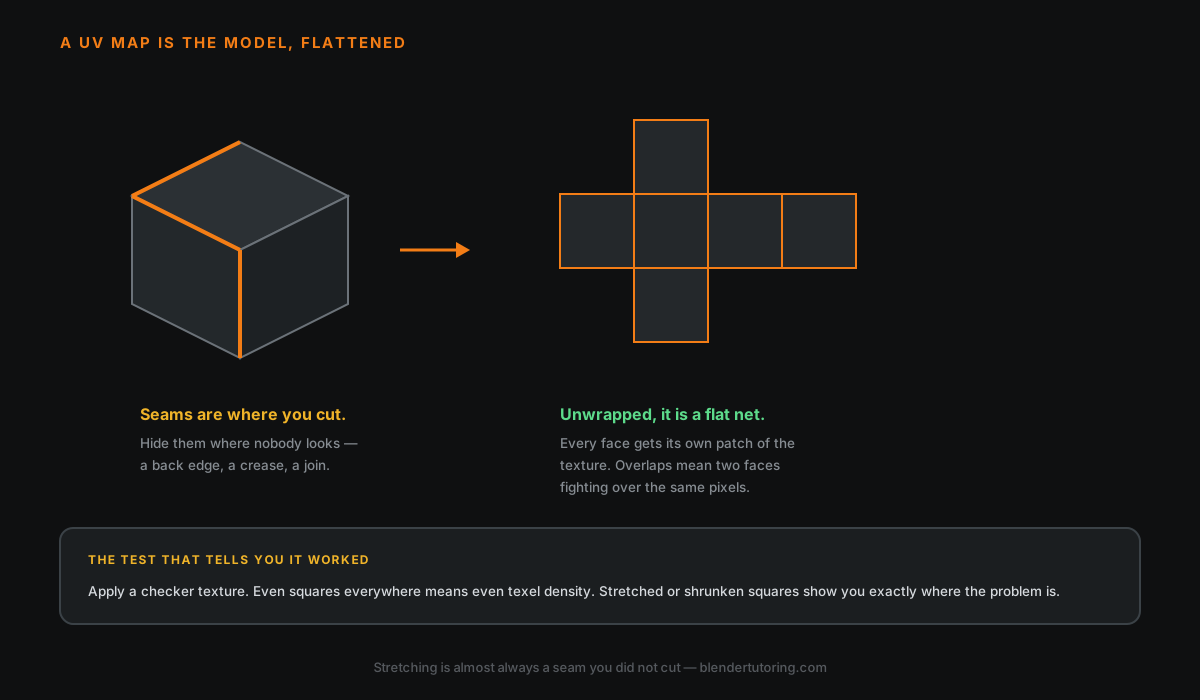
Take a cardboard box. Cut along some of its edges, flatten it out, and you get a flat cross shape on the table. That flat shape is the UV map. The cuts you made are the seams.
That's the whole idea. Your 3D surface has to be flattened into 2D so that a flat image can be painted onto it. Blender can't do that flattening well without knowing where you're willing to cut.
💡 If you never tell Blender where to cut, it makes a bad guess — and a bad guess is exactly what stretched, smeared textures look like.
🧵 Where to Put Seams
The instinct is to avoid cutting. Resist it. More seams in sensible places beats fewer seams in bad ones.
Two ways to think about it:
- Like a cardboard box — cut along structural edges so the pieces lie flat without distorting
- Like clothing patterns — a sewing pattern hides its seams under the arms and along the sides
The practical rule: put seams where nobody will look. Under the object, inside a fold, along a sharp corner, behind the character. A seam is only a problem if it's visible.
To mark one: in Edit Mode, switch to edge select, pick your edges, then Ctrl+E → Mark Seam. Marked seams turn red.
🔧 The Actual Workflow
| Step | What you do |
|---|---|
| 1 | Switch to the UV Editing workspace at the top of Blender |
| 2 | In Edit Mode, select edges and Ctrl+E → Mark Seam |
| 3 | Select everything with A |
| 4 | Press U → Unwrap |
| 5 | Check the result in the UV editor on the left |
| 6 | Add seams and re-unwrap until nothing looks stretched |
That's it. Unwrapping isn't one action, it's a loop — mark, unwrap, look, adjust.
The escape hatch: U → Smart UV Project lets Blender decide the seams itself. It's genuinely fine for hard-surface props, machinery, and anything you won't hand-paint. It's poor for characters and anything organic. Don't feel clever for avoiding it.
🗺️ Which Method, and When
The U menu offers more than Unwrap, and picking the right one saves a lot of seam-marking.
| Method | Best for | Watch out for |
|---|---|---|
| Unwrap | Anything you've marked seams on | Needs seams, or it guesses badly |
| Smart UV Project | Hard-surface props, machinery, background assets | Produces many small islands; messy to hand-paint |
| Cube / Cylinder / Sphere Projection | Objects that genuinely are that shape | Distorts the moment the shape deviates |
| Project from View | Flat things photographed head-on — signs, posters, decals | Only correct from that one camera angle |
| Follow Active Quads | Long even runs — roads, pipes, corridors, brick walls | Needs clean quad topology to behave |
Unwrap itself has two methods in the operator panel. Angle Based is the default and the one you want almost always. Conformal preserves angles more strictly and can behave better on simple tube-like shapes, but tends to produce more stretch elsewhere. If an unwrap looks wrong, it is worth one click to try the other before adding more seams.
🏁 How to Tell If It Worked
You cannot judge an unwrap by looking at the UV layout. You judge it by putting a test pattern on the model.
In the image editor, create a New image and set its type to UV Grid or Colour Grid, then apply it to your object. Now look at your model:
- Squares still look square → your unwrap is good
- Squares stretched into rectangles → that area needs more seams
- Squares wildly different sizes across the model → your texture detail will be uneven
This one habit separates people who "can't do UVs" from people who can.
📏 Texel Density: The Professional Bit
Here is the thing tutorials skip, and it is the main reason hobby work looks like hobby work.
Texel density is how many texture pixels land on a given amount of surface. If one island is scaled twice as large as another in the UV editor, that part of the model gets twice the texture resolution — and it will look visibly sharper than the part next to it.
You see this on student work constantly: a crisp door handle on a blurry door.
The fix is to decide on one density for the whole asset and hold everything to it. Blender gives you a blunt but effective tool: select everything in the UV editor and use UV ▸ Average Islands Scale. That equalises the islands relative to each other, so nothing is accidentally four times sharper than its neighbour.
💡 For game work the density is usually set per project — every asset in the scene shares one number, so a wall and a crate placed side by side match. Pick a value early; retrofitting it across a finished set is miserable.
Deliberate exceptions are fine. A hero prop the camera lingers on can justify more density than a background wall. The point is that it is a decision, not an accident.
📦 Packing and Margins
Once your islands are unwrapped, they have to share one square efficiently. UV ▸ Pack Islands arranges them for you.
The setting that matters is Margin — the gap left between islands.
Set it to zero and you will get bleeding: colour from one island leaking into its neighbour along the edges. It gets dramatically worse at distance, because smaller mipmaps blend neighbouring pixels together, so an object that looked fine close up develops coloured fringes across the room.
A small margin costs you a little texture space and prevents the problem entirely. Leave the default rather than chasing maximum coverage.
💡 Empty space in a UV map is wasted resolution, but overlapping islands you did not intend are far worse. Pack tightly, not perfectly.
💣 The Gotcha That Wastes Everyone's Afternoon
Apply your scale before unwrapping.
If you scaled your object in Object Mode, Blender is still carrying that scale as a transform, and it will quietly distort your unwrap. In Object Mode, press Ctrl+A → Scale, then unwrap.
Enormous numbers of "my UVs are broken and I don't know why" posts are this exact problem.
💡 The same applies to rotation. Ctrl+A offers Rotation and All Transforms alongside Scale — if an object has been rotated in Object Mode and then unwrapped, projections like Cube and Project from View will come out on an axis you did not expect.
🔁 Overlapping and Mirrored UVs
Overlapping islands mean two parts of the model share the same patch of texture. Whether that is a bug or a feature depends entirely on what you are making.
When it helps. Both sides of a symmetrical object can share one set of pixels, halving the texture you need. A game asset built with the Mirror Modifier does this by default — the mirrored half lands exactly on top of the original in UV space. For tiling surfaces and symmetrical wear it is free efficiency.
When it hurts. Anything that must be unique on each side: text, logos, a scar on one cheek, asymmetric damage. Paint one and it appears mirrored on the other.
Baking is the hard limit. If you are baking lighting, ambient occlusion or a normal map, overlapping islands corrupt the result — two surfaces compete to write the same pixels. Baking needs every island in its own space, even when the final colour texture reuses them.
If you need to break the overlap after mirroring: apply the modifier, select the islands of one half in the UV editor, and move them off the original — commonly into the neighbouring UV tile or simply beside it.
🎛️ Worth Memorising
Only a handful of these matter day to day.
| Key | Where | Does |
|---|---|---|
| U | 3D viewport, Edit Mode | Opens the unwrap menu |
| Ctrl+E | 3D viewport, Edit Mode | Edge menu — Mark and Clear Seam |
| P | UV editor | Pin a vertex so re-unwrapping leaves it alone |
| Alt+P | UV editor | Unpin |
| L | UV editor | Select a whole island under the cursor |
| Ctrl+A | Object Mode | Apply transforms — do this before unwrapping |
Pinning is the one most people never find. Pin a few vertices where you want them, turn on UV ▸ Live Unwrap, and the rest of the island re-solves around them as you drag. It turns unwrapping from guess-and-repeat into something you steer directly.
🤷 When You Can Skip It Entirely
Not everything needs careful UVs:
- Procedural materials — noise, gradients, and the like often need no UV map at all
- Single-colour or simple metal objects — nothing to align
- Hard-surface props — Smart UV Project is usually enough
- Background objects — nobody is inspecting them
Save your patience for the hero object that's actually on screen.
Why This One Is Worth Asking About
UV unwrapping is unusually hard to learn from videos, because the answer to "where do the seams go" depends entirely on the model in front of you. A tutorial can show you the buttons; it can't look at your mesh and say cut there, not there.
That's a five-minute conversation and a months-long frustration, depending on whether anyone's there to have it with you.
Read next: Cycles vs EEVEE — once your textures sit properly, the render engine decides how they actually look.
Stuck on your own model rather than a tutorial's? Book a free intro call →
Newsletter
Get more tips like this
Short, practical Blender guides for beginners — straight to your inbox. No spam. Unsubscribe any time.