Grease Pencil in Blender: The Complete Guide
2026-11-12
Most people meet Blender as a 3D program and never realise it's also one of the best free 2D animation tools in existence. That's Grease Pencil — a feature that lets you draw actual strokes in 3D space, animate them frame by frame like traditional hand-drawn animation, and mix flat 2D artwork into fully 3D scenes. It's what studios used for the Blender shorts Hero and Sprite Fright, and it's sitting in your copy of Blender right now. This is the complete beginner's guide: what it is, how it's organised, and how to go from a blank canvas to a finished, animated drawing.
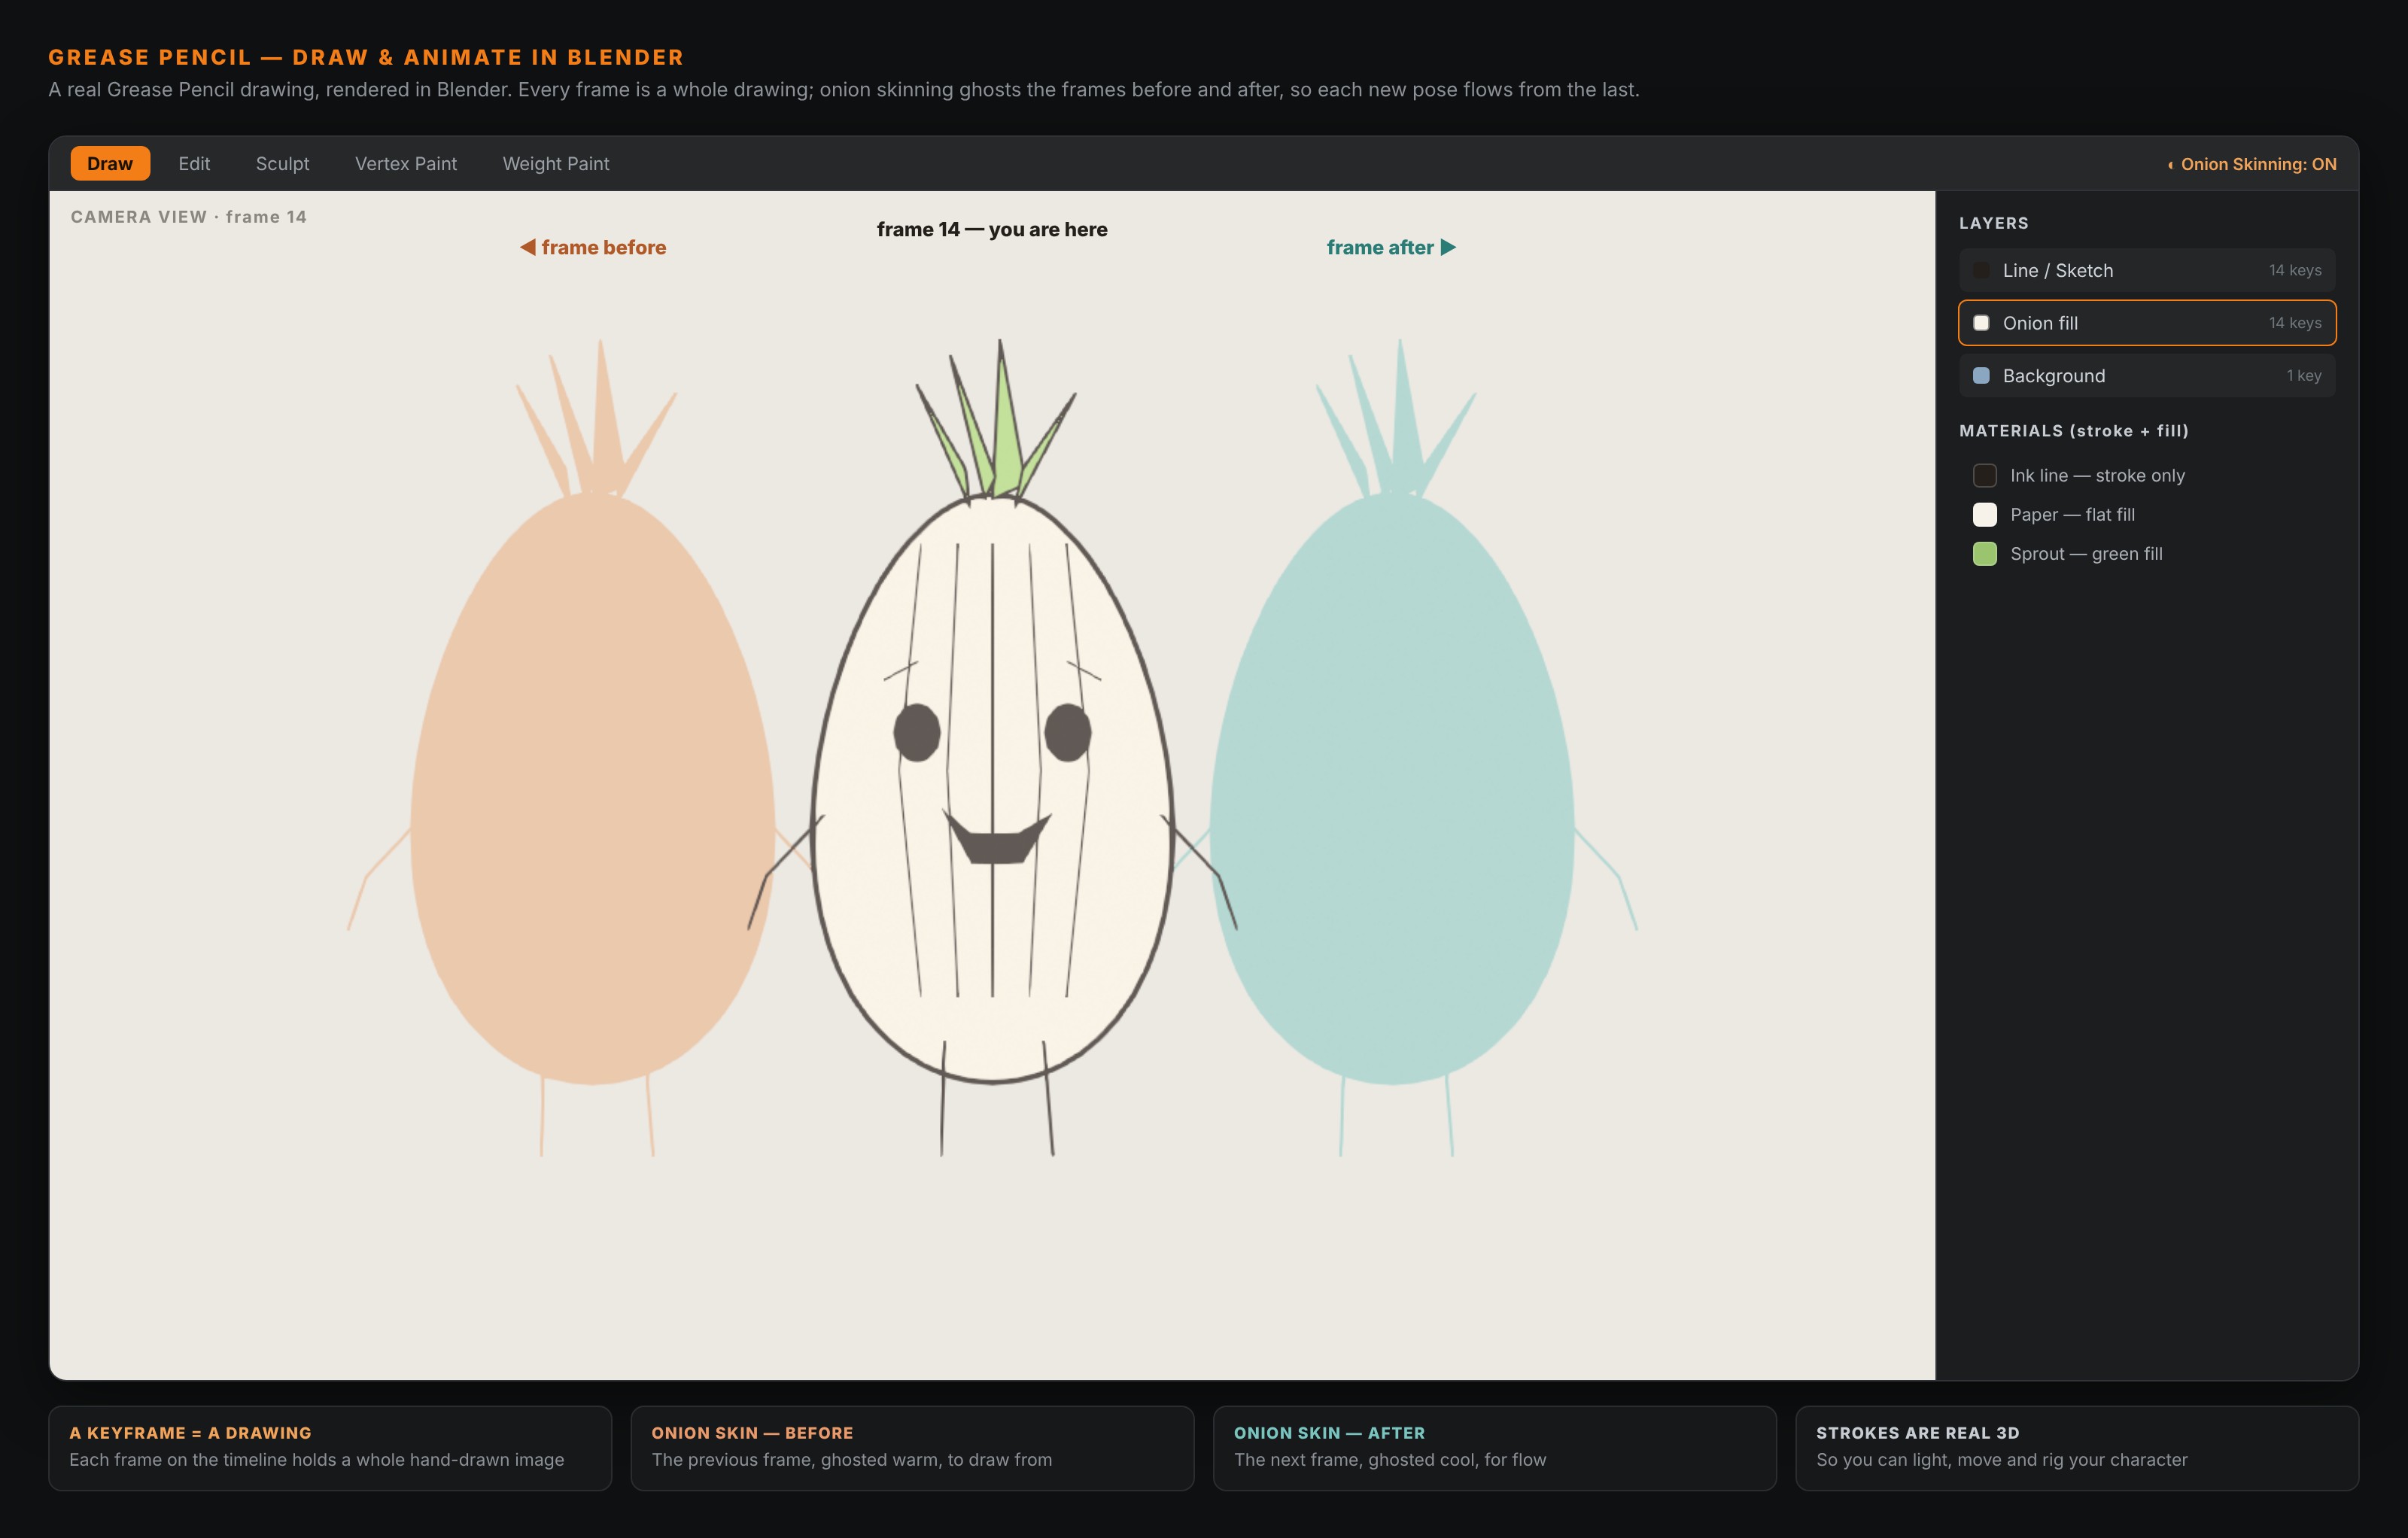
That ghosting is onion skinning — faded versions of the frames before and after the one you're drawing — and it's the heart of how 2D animation works in Blender. We'll build up to it.
Get this guide as a printable PDF → — the whole thing, formatted to keep open on a second screen while you draw. Free — straight to your inbox.
🎨 What Grease Pencil Actually Is
Grease Pencil is a drawing tool that makes real geometry. When you draw a stroke, Blender doesn't paint pixels onto an image — it creates an object made of editable strokes that live in 3D space. That one fact is what makes it special, and it unlocks three very different ways to work:
- Flat 2D animation — draw and animate like you would in a traditional 2D package, frame by frame, facing the camera.
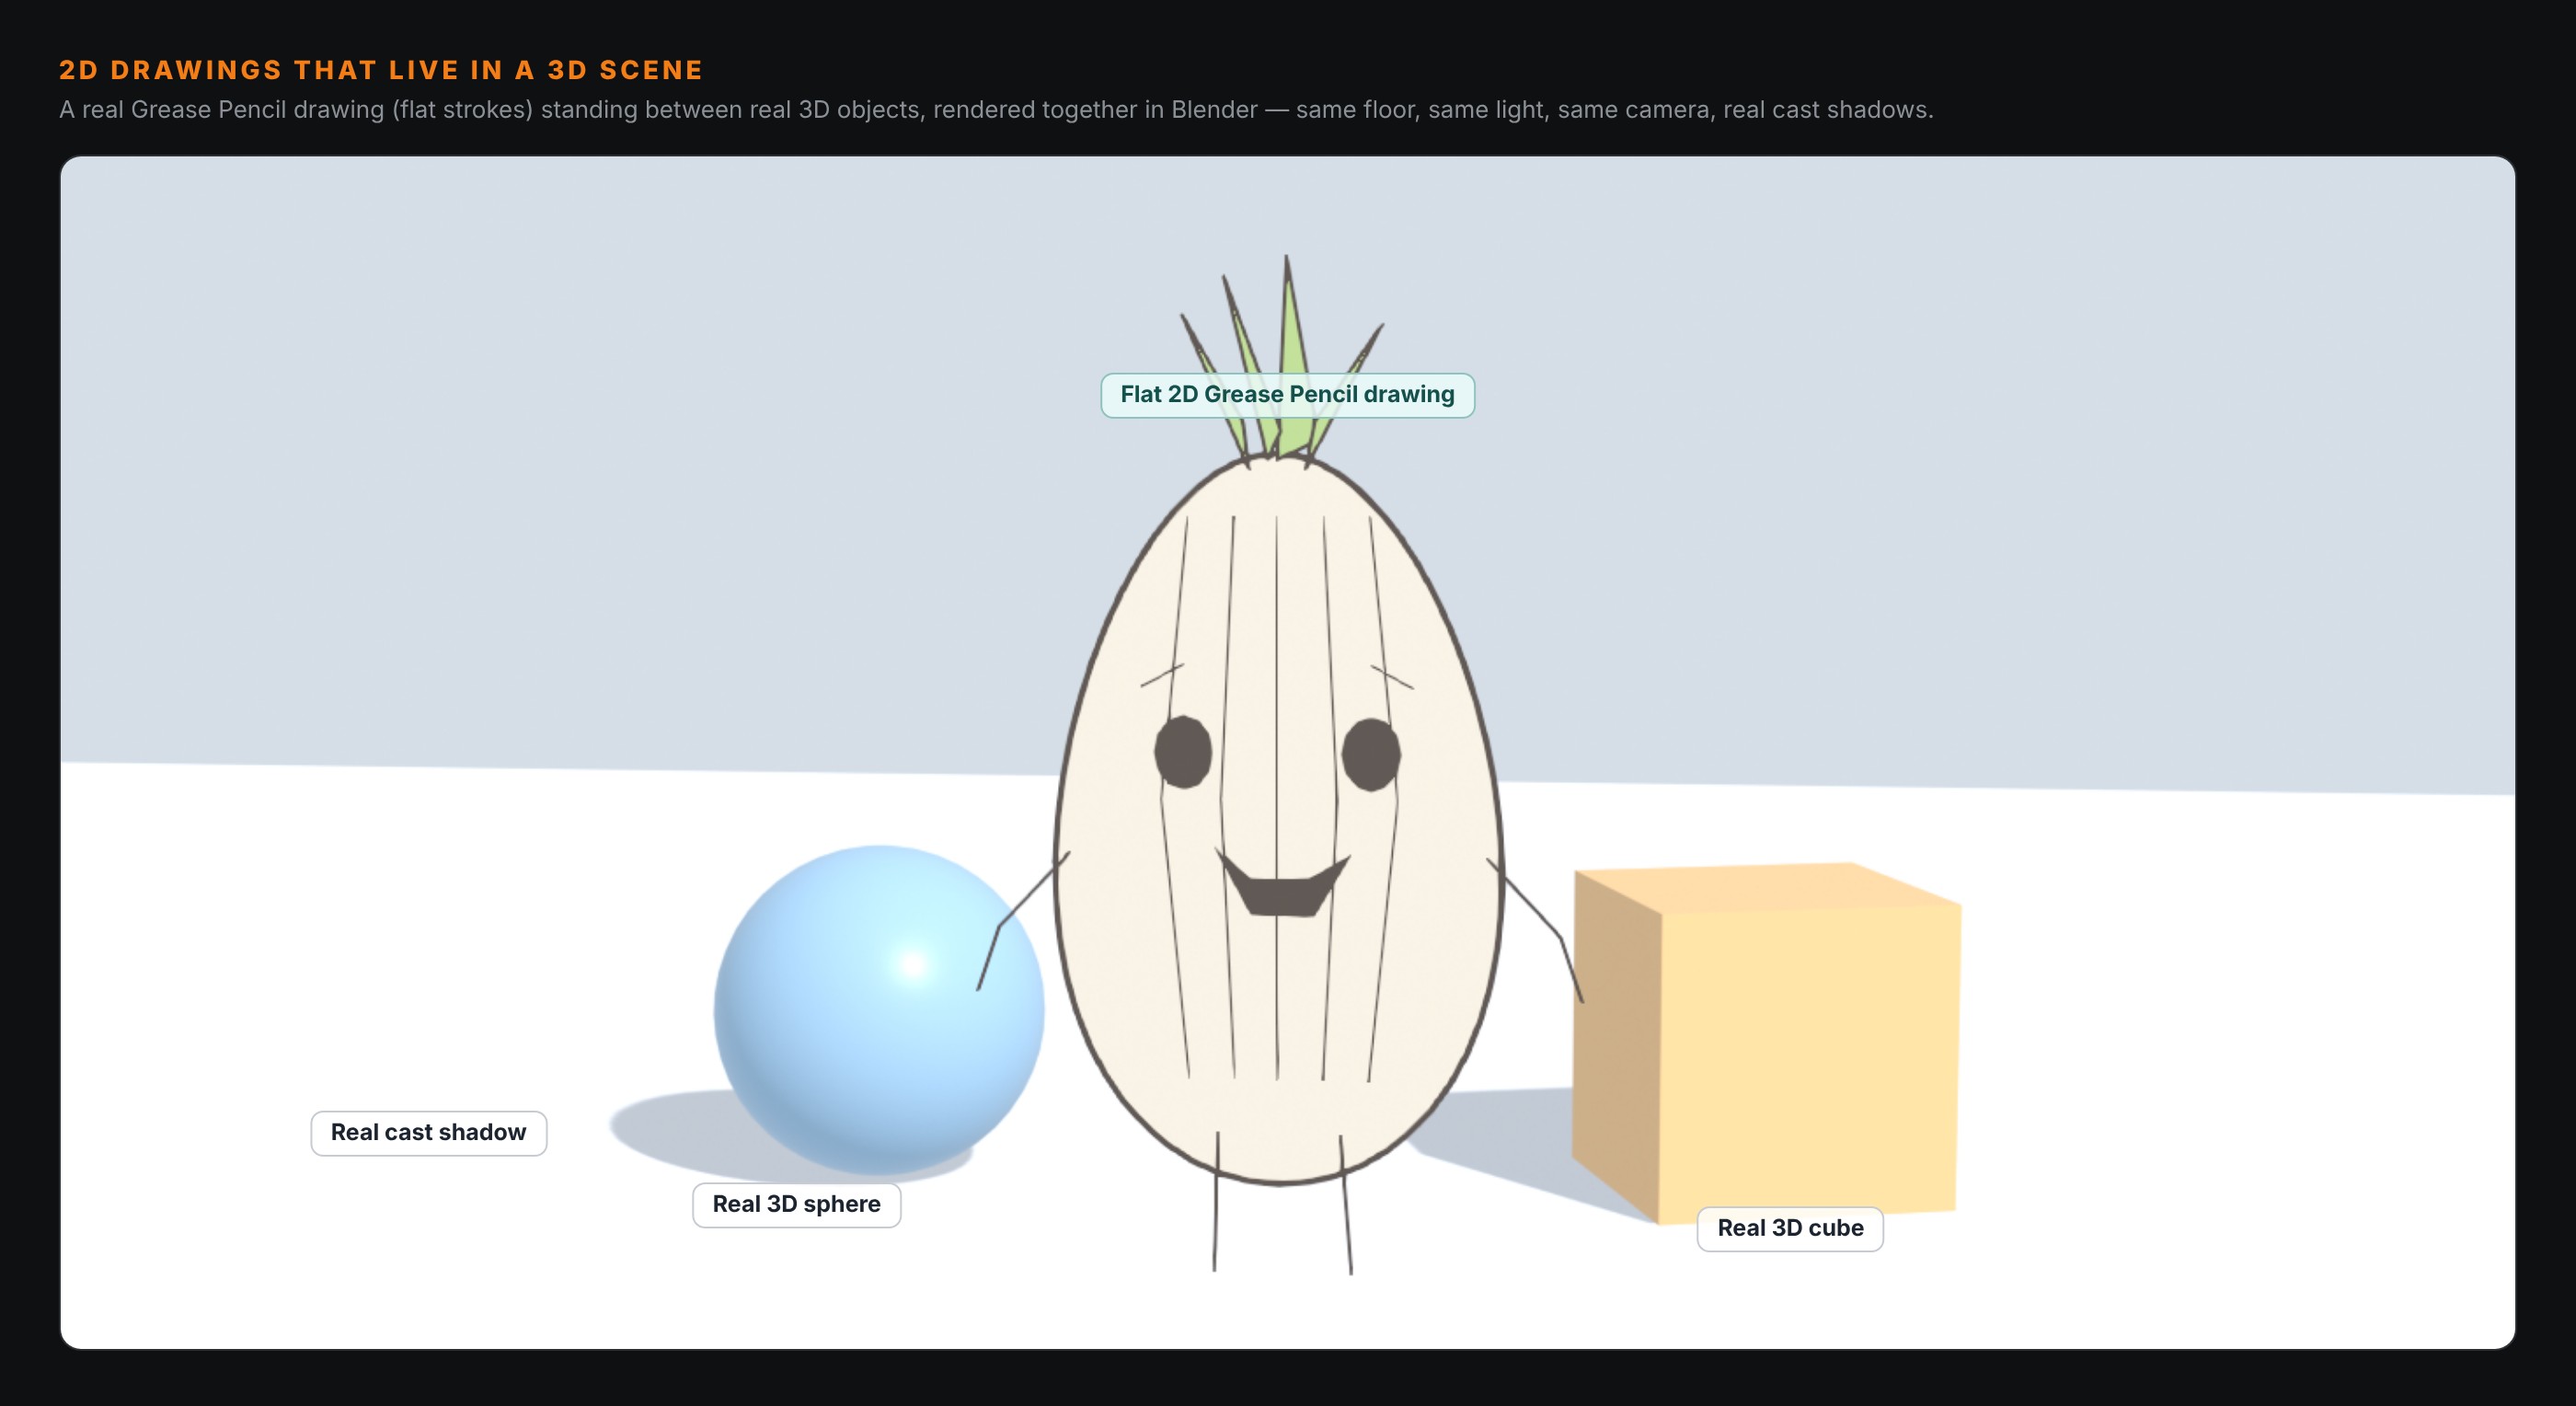
- 2D-in-3D — draw characters and effects that sit inside a 3D set, catching the same lights and camera moves as your models.
- Sketching and storyboarding — rough out shots, annotate a scene, or doodle concepts directly in the viewport.
Because the strokes are real objects, you can move them, rotate them, light them, parent them to rigs, and push them around with modifiers — things a normal paint program simply can't do.
🆕 Grease Pencil 3: Why Tutorials Disagree
If you follow an older tutorial and the buttons don't match, here's why. Blender 4.3 (November 2024) shipped "Grease Pencil v3" — a complete rewrite of the whole system. It was rebuilt from the ground up to be faster on big projects and to lay a foundation for years of future work.
What the rewrite brought:
- Layer groups — organise layers into folders, finally.
- Gradient-filled strokes and better fill control.
- A reworked eraser that behaves far more sensibly.
- Geometry Nodes support — you can now drive Grease Pencil with the same procedural node system used for 3D.
Two things to know before you start: files are not backward compatible (a drawing made in 4.3+ won't open correctly in 4.2 or earlier), and a few old features — notably the drawing guides — were deprecated. Use Blender 4.3 or newer and your menus will match this guide.
🚀 Starting a 2D Drawing
The fastest way in is the built-in template:
- File ▸ New ▸ 2D Animation.
That's it. Blender reconfigures the whole window for you: it creates a Grease Pencil object already set up to draw, switches to a front-on camera view, turns onion skinning on, and drops you into Draw Mode with a black stroke ready to go. Left-click-drag on the canvas and you're drawing.
If you'd rather add drawing to an existing 3D scene instead, use Add ▸ Grease Pencil ▸ Blank (or Stroke) and you'll get a Grease Pencil object you can draw on in your 3D set.
🖐️ The Five Modes
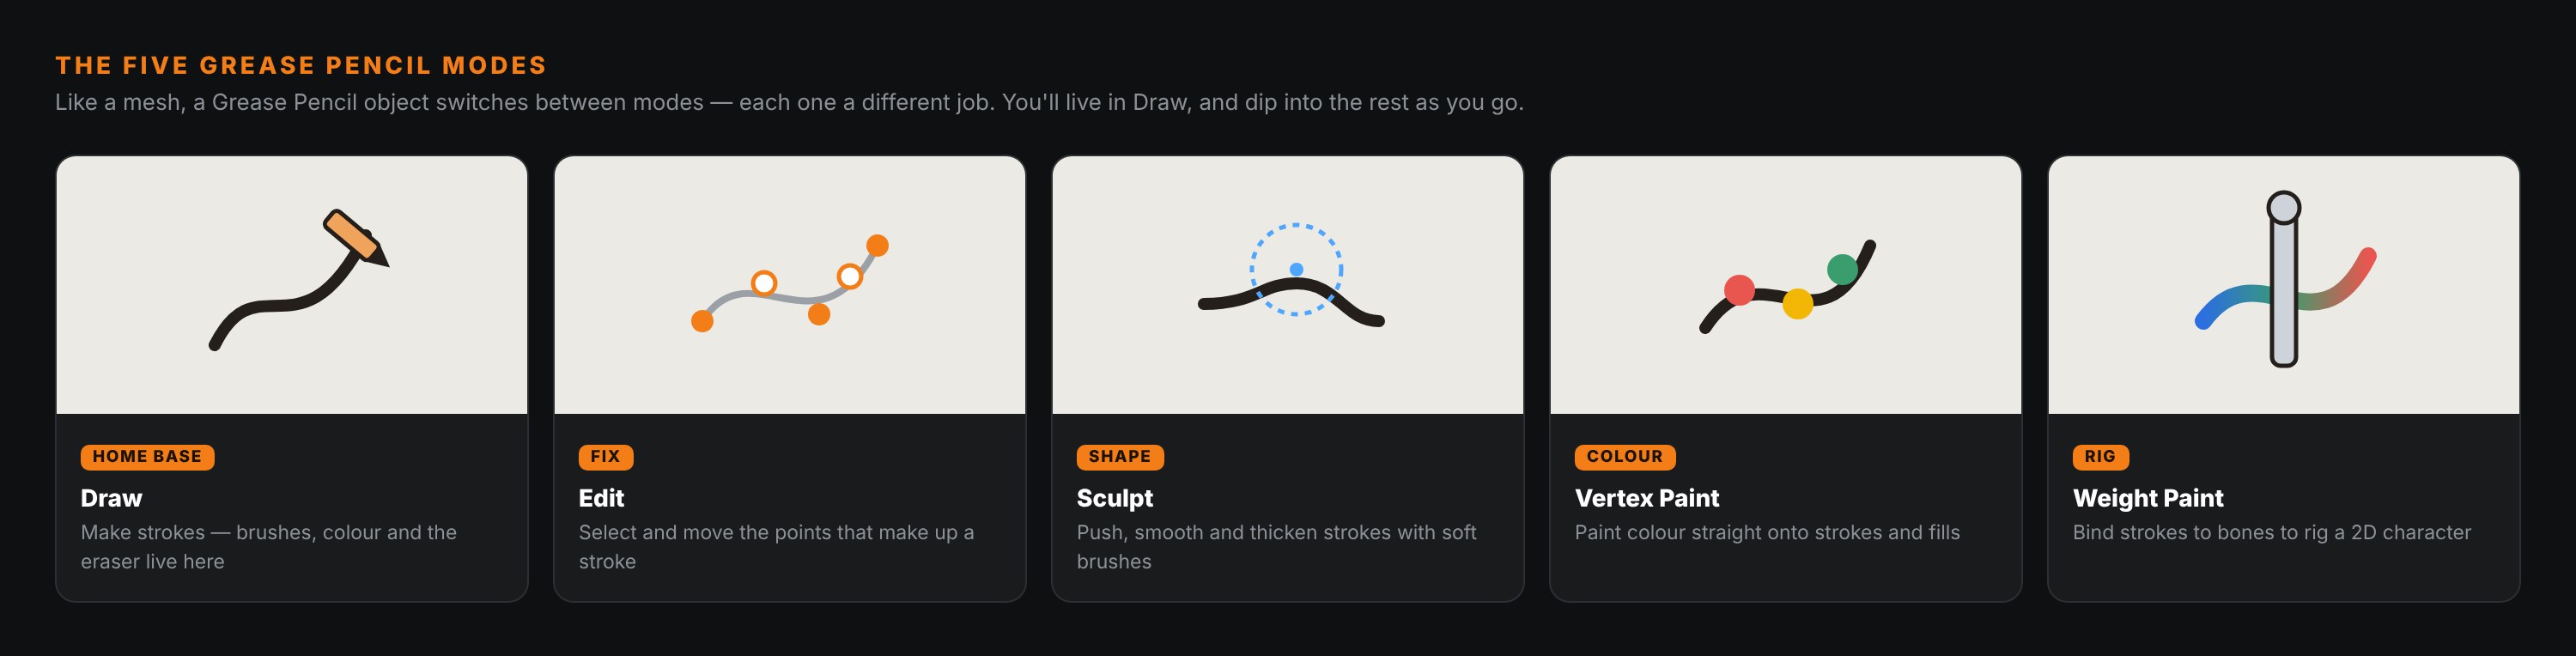
Like a mesh object, a Grease Pencil object has modes — and switching between them (the dropdown at the top-left of the viewport, same place as Object/Edit Mode for meshes) is most of the workflow:
- Draw Mode — where you make strokes. Your brushes, colours and the eraser live here. This is home base.
- Edit Mode — select and move the individual points that make up a stroke, exactly like editing mesh vertices. For fixing and reshaping.
- Sculpt Mode — push, smooth, thicken and nudge strokes with soft brushes, instead of grabbing points one by one. Great for cleaning up loose linework.
- Vertex Paint Mode — paint colour directly onto strokes and fills, on top of their material.
- Weight Paint Mode — assign strokes to bones, for when you rig a 2D character to an armature.
For plain drawing and animating you'll live in Draw and dip into Edit and Sculpt. The other two matter once you start rigging.
🖌️ Strokes, Fills and Materials
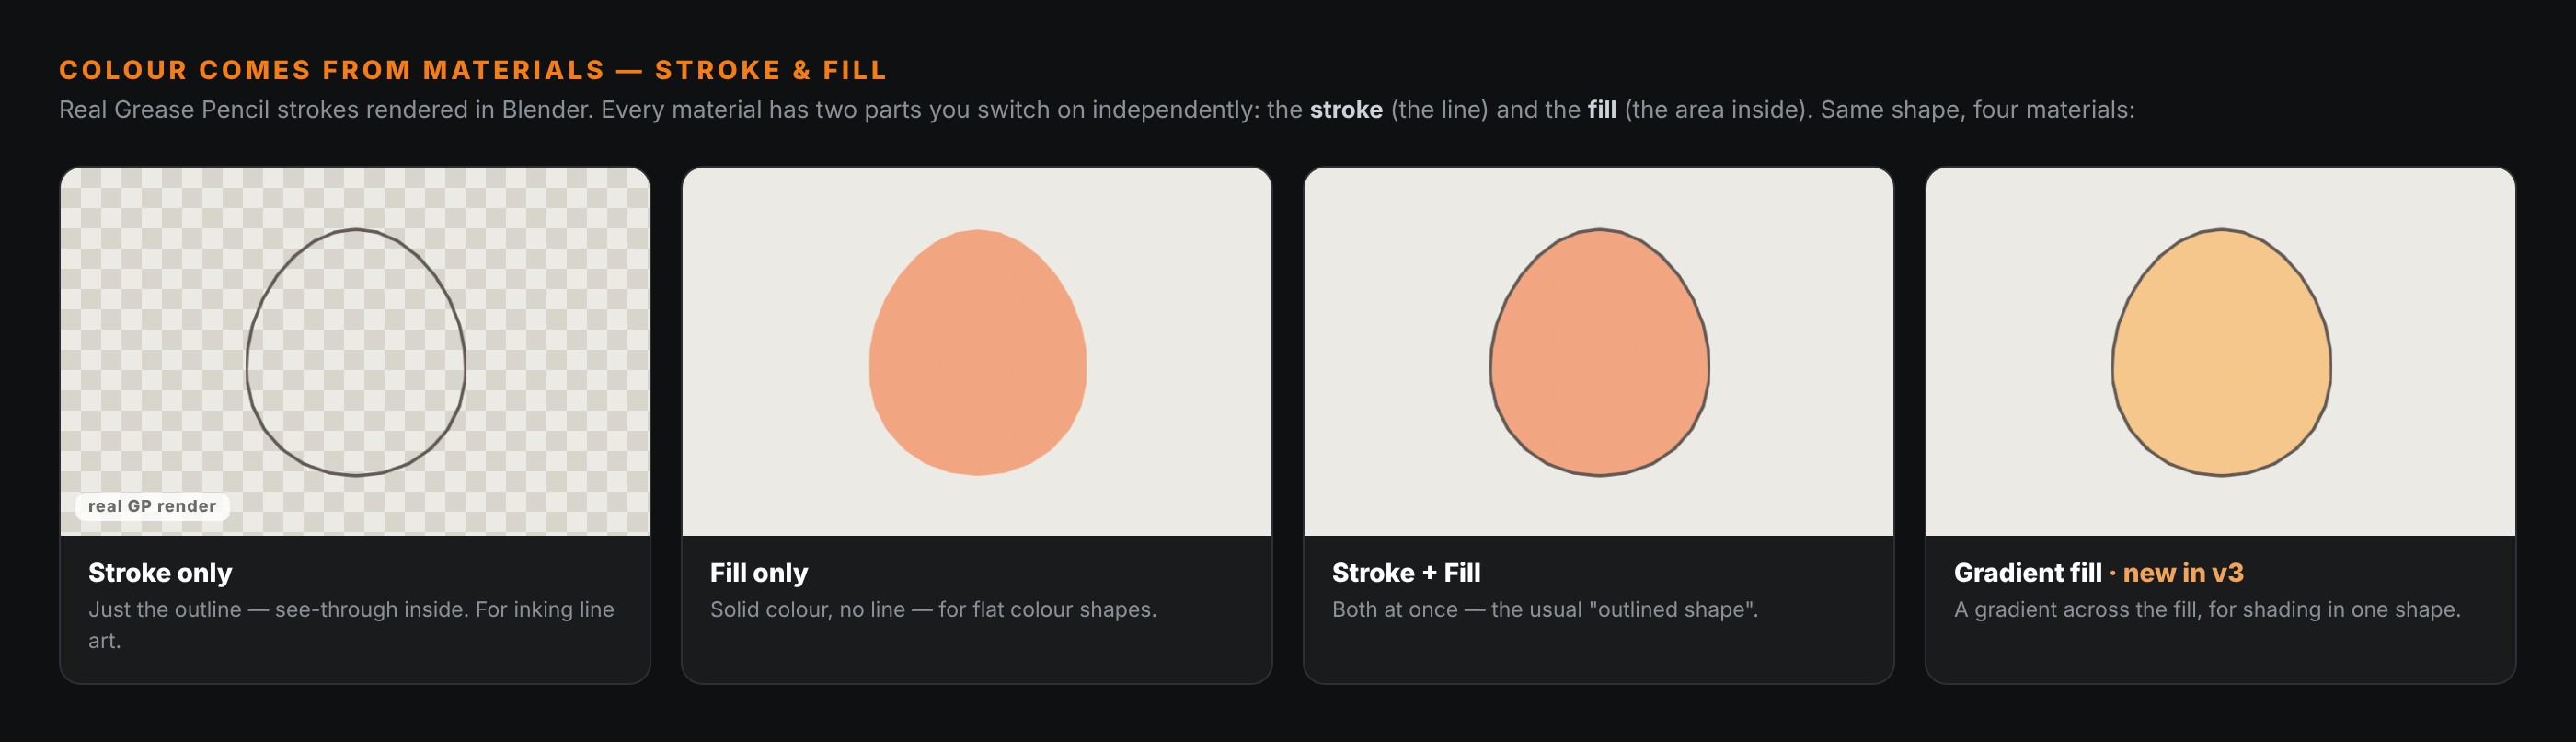
Here's the thing that confuses newcomers: in Grease Pencil, colour comes from materials, not from the brush. Each material has two parts you can switch on independently:
- Stroke — the line itself: its colour, and whether it's a solid line or a texture.
- Fill — the area enclosed by strokes: a flat colour, a gradient (new in v3), or a texture.
So a single material could be "black line, no fill" for inking, or "no line, red fill" for a flat colour shape, or both at once. You build a small palette of materials — line, skin, shirt, shadow — and pick one before you draw, the way a 2D artist picks up a different pen or fills a region. To fill an enclosed shape, grab the Fill tool from the toolbar and click inside it.
📚 Layers
Grease Pencil layers work like layers in Photoshop or Procreate — stacked sheets you draw on, higher ones in front. They're essential for animation because you separate the parts that move from the parts that don't.
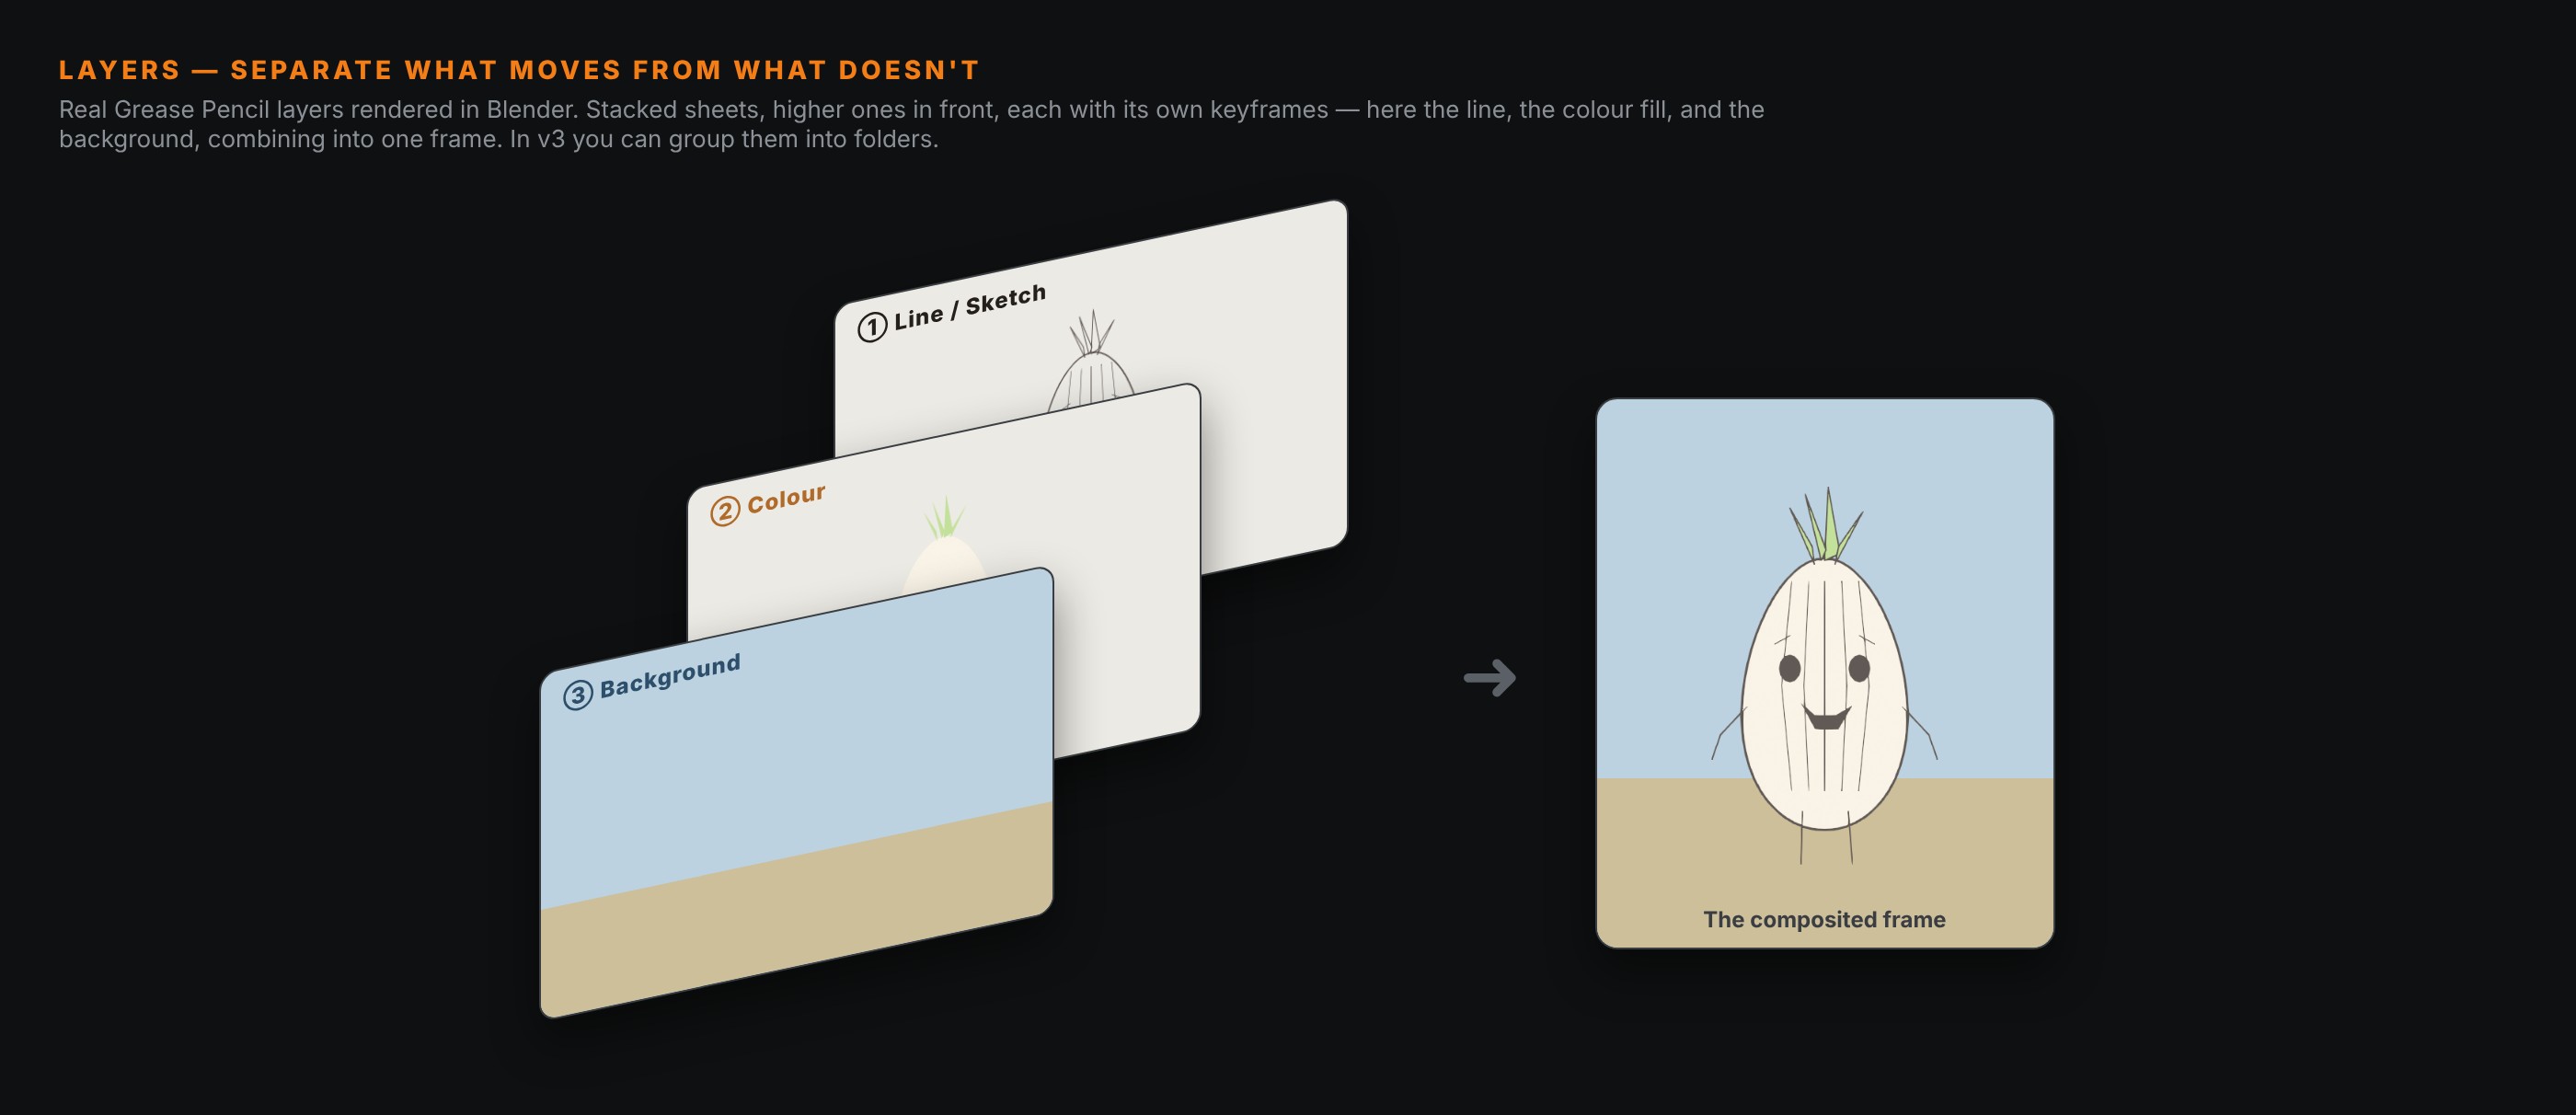
A typical setup: a Background layer that never changes, a Colour layer underneath, and a Line/Sketch layer on top. In v3 you can now group layers into folders to keep a complex character tidy. Each layer has its own opacity and its own onion-skin settings — and crucially, its own set of keyframes.
🎞️ Animating: Keyframes and Onion Skinning
This is where Grease Pencil becomes animation rather than drawing. It works like traditional hand-drawn animation, not like 3D keyframing:
- A Grease Pencil keyframe holds a whole drawing. On frame 1 you draw pose A; move to frame 10, draw pose B; Blender stores each as a separate drawing on the timeline. Play it back and it cuts from one to the next — that's 2D animation.
- Onion skinning shows you ghosts of the surrounding frames while you draw — typically the previous frame tinted one colour and the next frame tinted another. You draw your in-between using those ghosts as a guide, so each new drawing flows naturally from the last. It's the single most important tool in 2D animation, and the 2D template turns it on for you.
Add a new drawing by moving to a new frame and starting to draw (or use the Draw dope-sheet to insert blank/duplicate keyframes). The Dope Sheet, set to Grease Pencil mode, is where you slide those drawings around in time to control your spacing and timing.
🔄 Inbetweening Without Drawing Every Frame
You don't always have to draw every single frame. Grease Pencil can interpolate between two of your drawings — generating the in-between strokes automatically — which is perfect for smooth moves where a shape simply travels or morphs. You draw the start and end; Blender fills the gap. For organic, characterful motion you'll still draw by hand, but for mechanical tweens, interpolation saves enormous time.
🧊 Grease Pencil Inside a 3D Scene
Because strokes are real 3D objects, Grease Pencil shines as a bridge between 2D and 3D:
- Motion graphics — animated lines, arrows, scribbles and highlights that live in your 3D shot and move with the camera.
- 2D characters in 3D sets — a hand-drawn character walking through a rendered environment, lit by the same lamps.
- Annotations and notes — scribble directions onto a model for yourself or a client (there's also a lightweight Annotate tool for this).
- Effects — smoke, impact lines, sparks and other hand-drawn flourishes added on top of a 3D render.
You control how strokes sit in space with the Stroke Placement setting (on the 3D cursor, on the surface of objects, or on a flat plane facing the view), which decides where your 2D marks land in the 3D world.
🎬 Rendering and Exporting
Grease Pencil renders with both of Blender's engines — EEVEE and Cycles — so it composites naturally with your 3D work; its flat look survives either one. To output a finished 2D animation as a video, you use the same export path as any Blender animation: set Output ▸ File Format to FFmpeg Video, choose MPEG-4 / H.264, and Render ▸ Render Animation. (If you want the deeper walk-through of those settings, see the video-export guide linked below.) You can also export strokes as SVG or PDF vector files for use in other software.
⚠️ Beginner Gotchas
- "My menus don't match the tutorial." You're probably watching a pre-4.3 video. Grease Pencil v3 rearranged things — use Blender 4.3+ and a current guide.
- "I drew a shape but can't fill it." The fill needs an enclosed outline and the Fill tool; tiny gaps in the stroke let the fill leak. Close the shape or raise the fill tool's gap tolerance.
- "My stroke appears in the wrong place / floats off the object." That's Stroke Placement. Set it to draw on the surface or on the view plane depending on what you want.
- "My drawing has no colour." Colour lives in materials, not the brush — add a material with Stroke and/or Fill enabled and select it before drawing.
- "Playback just shows one drawing." You only have one keyframe. Move to a later frame and draw again to create the next one.
🎯 The Takeaway
Grease Pencil turns Blender into a genuine 2D animation studio — one where your drawings are real objects you can light, move through 3D space and drive with the same tools as your models. The learning path is short: start from the 2D Animation template, draw in Draw Mode, colour with materials, organise with layers, and animate frame by frame using onion skinning. Do that on Blender 4.3 or newer and everything in this guide lines up with what's on your screen. It's one of the most quietly powerful things Blender does, and it costs nothing to try.
Read next: How to Edit Video in Blender with the VSE — once you've animated your drawings, here's how to cut them together and export a finished video, all inside Blender.
Want to learn 2D animation in Blender properly, with someone watching your screen? Book a free intro call → and we'll map out a plan that fits what you want to make.
Free PDF
Get the Grease Pencil Starter Guide
The whole guide as a clean, printable PDF — the five modes, stroke-and-fill materials, layers and onion-skinning, formatted to keep on a second screen while you draw. Enter your email and it’s yours, with the occasional short Blender tip. No spam, unsubscribe any time.