How to Edit Video in Blender with the VSE
2026-11-12
Here's something most people learning Blender never find out: it ships with a complete video editor. Not a toy, not a "render your animation" button — an actual non-linear editor where you can cut clips, layer footage, add titles, mix audio and export a finished video. It's called the Video Sequence Editor (the VSE), it's been in Blender for years, and it's free, already installed, and good enough to cut together a tutorial, a YouTube video, or the shots from your own renders. Here's how it works, from opening it to exporting an MP4.
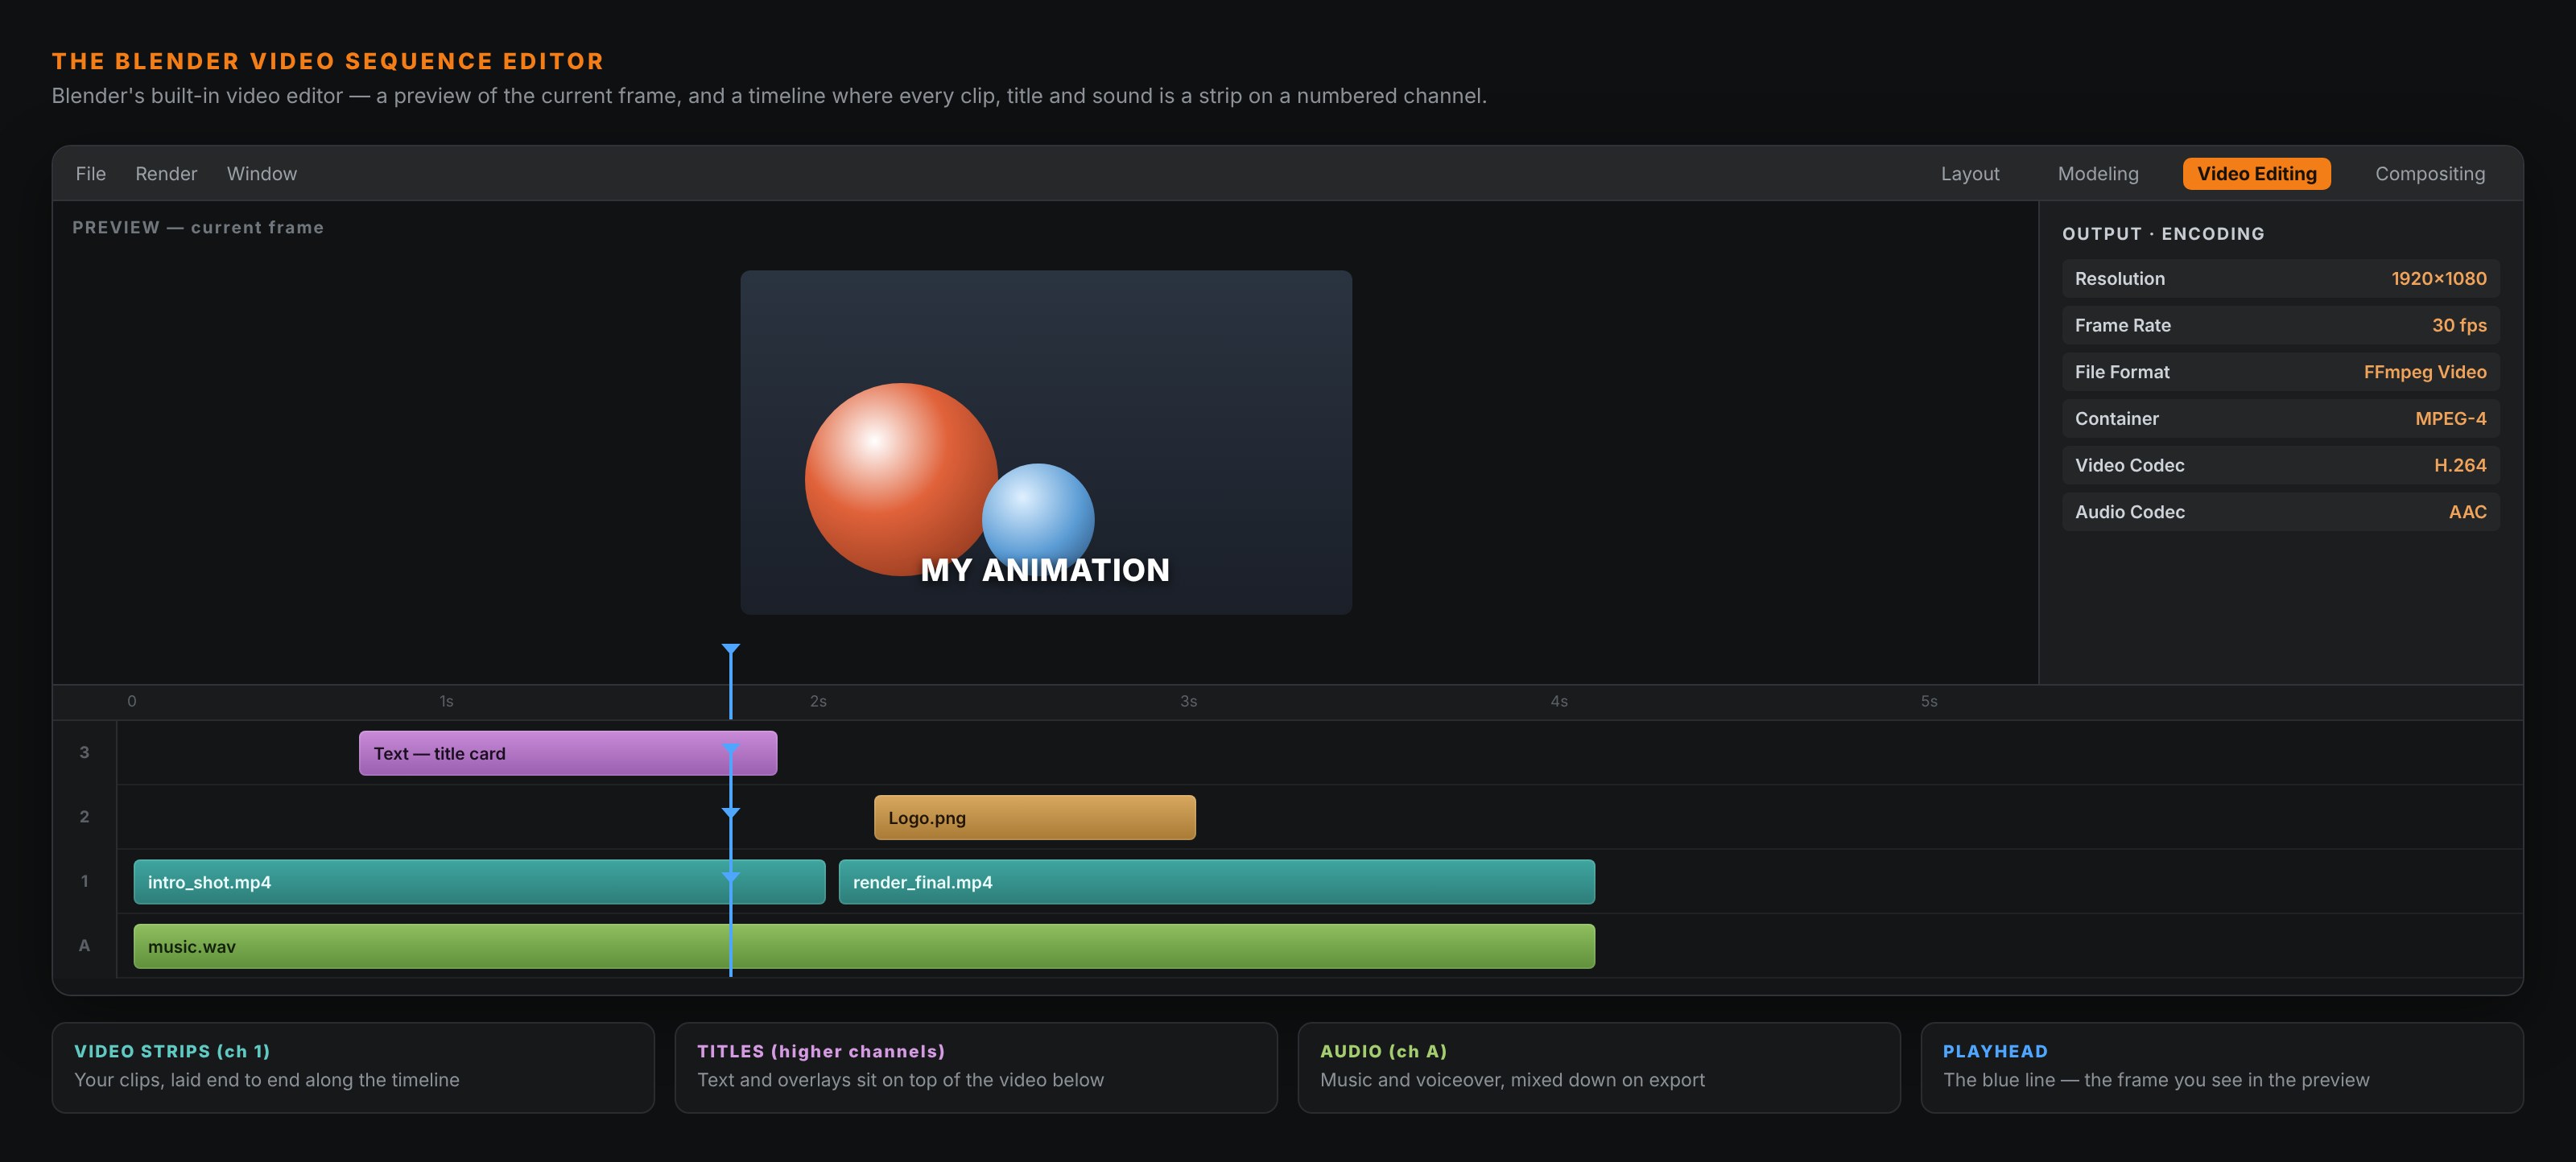
That's the whole editor in one picture: a preview up top showing the current frame, and a timeline below where your clips live as coloured bars. Once that layout makes sense, the rest is just details.
🎬 What the VSE Actually Is
The VSE is a non-linear editor — the same kind of tool as Premiere, DaVinci Resolve or CapCut, just built into Blender. "Non-linear" means you can drop clips anywhere on a timeline, trim them, slide them around and stack them, in any order, as many times as you like, without ever changing the original files.
It's genuinely capable: you can cut and arrange video clips, overlay images and text, add crossfades and simple effects, sync and mix audio, and render the result to a normal video file. What it is not is a visual-effects compositor (that's Blender's separate node Compositor) or a heavyweight colour-grading suite. For straightforward editing — assembling footage, trimming a talking-head video, stitching your rendered shots into a reel — it's more than enough.
Why bother when free editors exist? Three reasons: it's already on your machine, it opens Blender's own renders natively (no export-reimport dance), and learning it means one tool for modelling, animation and editing. If you're rendering animations in Blender anyway, editing them in Blender is the shortest path.
🧭 Opening the Video Editor
Blender hides the VSE behind a workspace, so it's easy to miss:
- At the very top of Blender, that row of tabs (Layout, Modeling, Sculpting…) is the workspace bar. Scroll it or click the + and look for Video Editing.
- Click it. The whole window rearranges: a Preview panel top-left, the Sequencer (your timeline) along the bottom, and some controls down the side.
That's the editing room. The big empty strip area is your timeline; the dark panel above it is where you'll see your footage play back.
If you don't see a Video Editing tab, click the + at the end of the workspace tabs and choose Video Editing from the list — it's a built-in template, not something you have to build.
🧱 The Four Things You Have to Understand
The VSE only has a handful of core concepts. Learn these four and you can edit:
- Strips. Every clip, image, sound or title is a strip — a coloured bar on the timeline. Video strips are usually teal, audio is green-ish, text and effects have their own colours. A strip is just a reference to your media; trimming or deleting it never touches the original file.
- Channels. The numbered horizontal rows (1, 2, 3…) stacked up the timeline. Higher channels sit on top of lower ones — exactly like layers in Photoshop. A title on channel 3 shows over the video on channel 1. This is how you overlay text and picture-in-picture.
- The playhead. The vertical blue line. Wherever it sits is the frame you see in the preview. Drag it, or press the arrow keys, to scrub through your edit. Spacebar plays and pauses.
- The timeline. Left-to-right is time. The numbers along the bottom are frames (and seconds). Your whole edit reads from left to right, bottom channel up.
That's the entire mental model. Everything else is just operations on strips.
➕ Getting Footage In
With the VSE open, add media from the Add menu at the top of the Sequencer (or drag files straight in from your file browser):
- Add ▸ Movie — a video clip. Blender drops in both a video strip and its audio strip together.
- Add ▸ Sound — a standalone audio file (music, voiceover).
- Add ▸ Image/Sequence — a still, or a folder of frames.
- Add ▸ Text — a title or caption (more on that below).
When you add a clip, it lands at the playhead. Left-click-drag a strip to move it; drag it up or down to put it on a different channel. To line two clips up back-to-back, just drag one until its edge snaps to the other.
Set your frame rate first. In Output Properties (the printer icon), set the Frame Rate to match your footage — 24, 25, or 30 fps are the usual ones. Do this before you build the edit, or your clips will play at the wrong speed and audio will drift out of sync.
✂️ The Edits You'll Actually Make
Ninety percent of editing is four moves:
- Cut a strip: put the playhead where you want the cut and press K (blade). The strip splits into two you can treat separately.
- Trim: drag either end of a strip inward to shorten it, or outward to reveal more. This is how you top-and-tail a clip.
- Move: G (grab) or just drag. Hold while dragging to slide a strip along its channel or lift it to another.
- Delete: select a strip and press X or Delete. The file is untouched — you're only removing it from the edit.
Select strips by clicking; box-select several with B or by dragging a rectangle. Everything is non-destructive, so experiment freely — you can always undo with Ctrl+Z.
🔤 Titles, Transitions and Audio
Three things that make an edit feel finished:
- Text / titles. Add ▸ Text drops a text strip. Put it on a channel above your video so it shows on top, then set the words, font, size and position in the strip's sidebar (press N to open it). In recent Blender you can even double-tap Tab to type directly in the preview.
- Crossfades. To dissolve from one clip to another, overlap the two strips slightly, select both, and use Add ▸ Transition ▸ Crossfade (for audio, Sound Crossfade). It fades one out as the other comes in.
- Audio. Sound strips behave like video strips — cut, trim and slide them the same way. Each strip has a Volume control in the sidebar, and you can stack music under a voiceover on separate channels. Blender mixes them all down on export.
You don't need more than this for a clean, watchable video.
📤 Exporting Your Video (the part people get stuck on)
This is where beginners trip, because rendering a video isn't the same as rendering a frame. Go to Output Properties and set it up like this:
- Resolution & frame rate — match your footage (e.g. 1920×1080, 30 fps).
- Output ▸ File Format — change it from PNG to FFmpeg Video. This is the step everyone misses; without it you'll get a folder of still images instead of a movie.
- Encoding ▸ Container — choose MPEG-4. That gives you a standard .mp4.
- Encoding ▸ Video Codec — choose H.264 (the universal, plays-everywhere choice; newer Blender also offers H.265 if you need it).
- Encoding ▸ Audio Codec — set it to AAC, or your video will export silent.
- Pick where the file saves in the Output path at the top.
Then render the timeline, not the 3D scene: Render ▸ Render Animation (or Ctrl+F12). Blender plays through your edit and writes the finished video to your output folder.
⚡ Want all of that in one click? I made a free Blender addon that does it for you — download Quick MP4 Export (Blender 3.0–4.x). Install it via Edit ▸ Preferences ▸ Add-ons ▸ Install…, then in the Sequencer open the N sidebar, go to the Export tab, and hit one button to set FFmpeg Video / MP4 / H.264 / AAC — including the Sequencer checkbox, so you never hit the traps below.
If your export comes out black or empty: check that Post Processing ▸ Sequencer is ticked in Output Properties. It's on by default, but if it ever gets switched off, Blender ignores your VSE edit entirely and renders the empty 3D scene instead.
⚠️ Common Gotchas
- A folder of PNGs instead of a video. You left File Format on an image format. Set it to FFmpeg Video (step 2 above).
- No sound in the export. You didn't set an Audio Codec (AAC). Blender defaults to no audio.
- Clips play too fast or too slow. Your project frame rate doesn't match the footage. Fix the frame rate before editing, not after.
- The preview is laggy on big clips. Normal — proxies and Blender's newer playback speedups help, but a long 4K timeline will tax any editor. Drop the preview resolution in the sidebar while you work.
- I rendered and got my 3D scene, not my edit. The Sequencer checkbox in Post Processing got turned off. Turn it back on.
🎯 The Takeaway
Blender's Video Sequence Editor won't replace a dedicated pro NLE for a feature film — but for cutting together your renders, trimming footage, adding titles and exporting a clean MP4, it's a genuinely good editor that you already own. The model is tiny: strips on channels, a playhead for time, and a handful of keys (K to cut, G to move, X to delete). Learn those, set your export to FFmpeg Video / MP4 / H.264 / AAC, and you can take a project from first clip to finished video without ever leaving Blender.
Read next: Cycles vs EEVEE: Which Blender Render Engine Should You Use? — before you edit an animation, you have to render it; here's how to pick the engine that gets you there fastest.
Rendering shots and not sure how to stitch them into something watchable? Book a free intro call → and share your screen — we'll walk through your edit and export settings together, start to finish.
Newsletter
Get more tips like this
Short, practical Blender guides for beginners — straight to your inbox. No spam. Unsubscribe any time.