Blender for Maya Users: Look and Feel Like Maya
2026-11-06
You spent years in Maya. The blue-grey viewport, the hotbox under your thumb, the Channel Box down the right side, the way your hand tumbles the camera without a thought — all of it is wired into you. Then you open Blender and every colour is wrong, every panel is somewhere else, and nothing answers to the keys you know. The good news: two free, open-source projects close most of that gap. One makes Blender look like Maya. The other makes it work like Maya. Install both and the program in front of you lands startlingly close to home — while plain Blender stays one click away underneath. Here is each of them, how to set them up, and an honest account of what they can and cannot do.
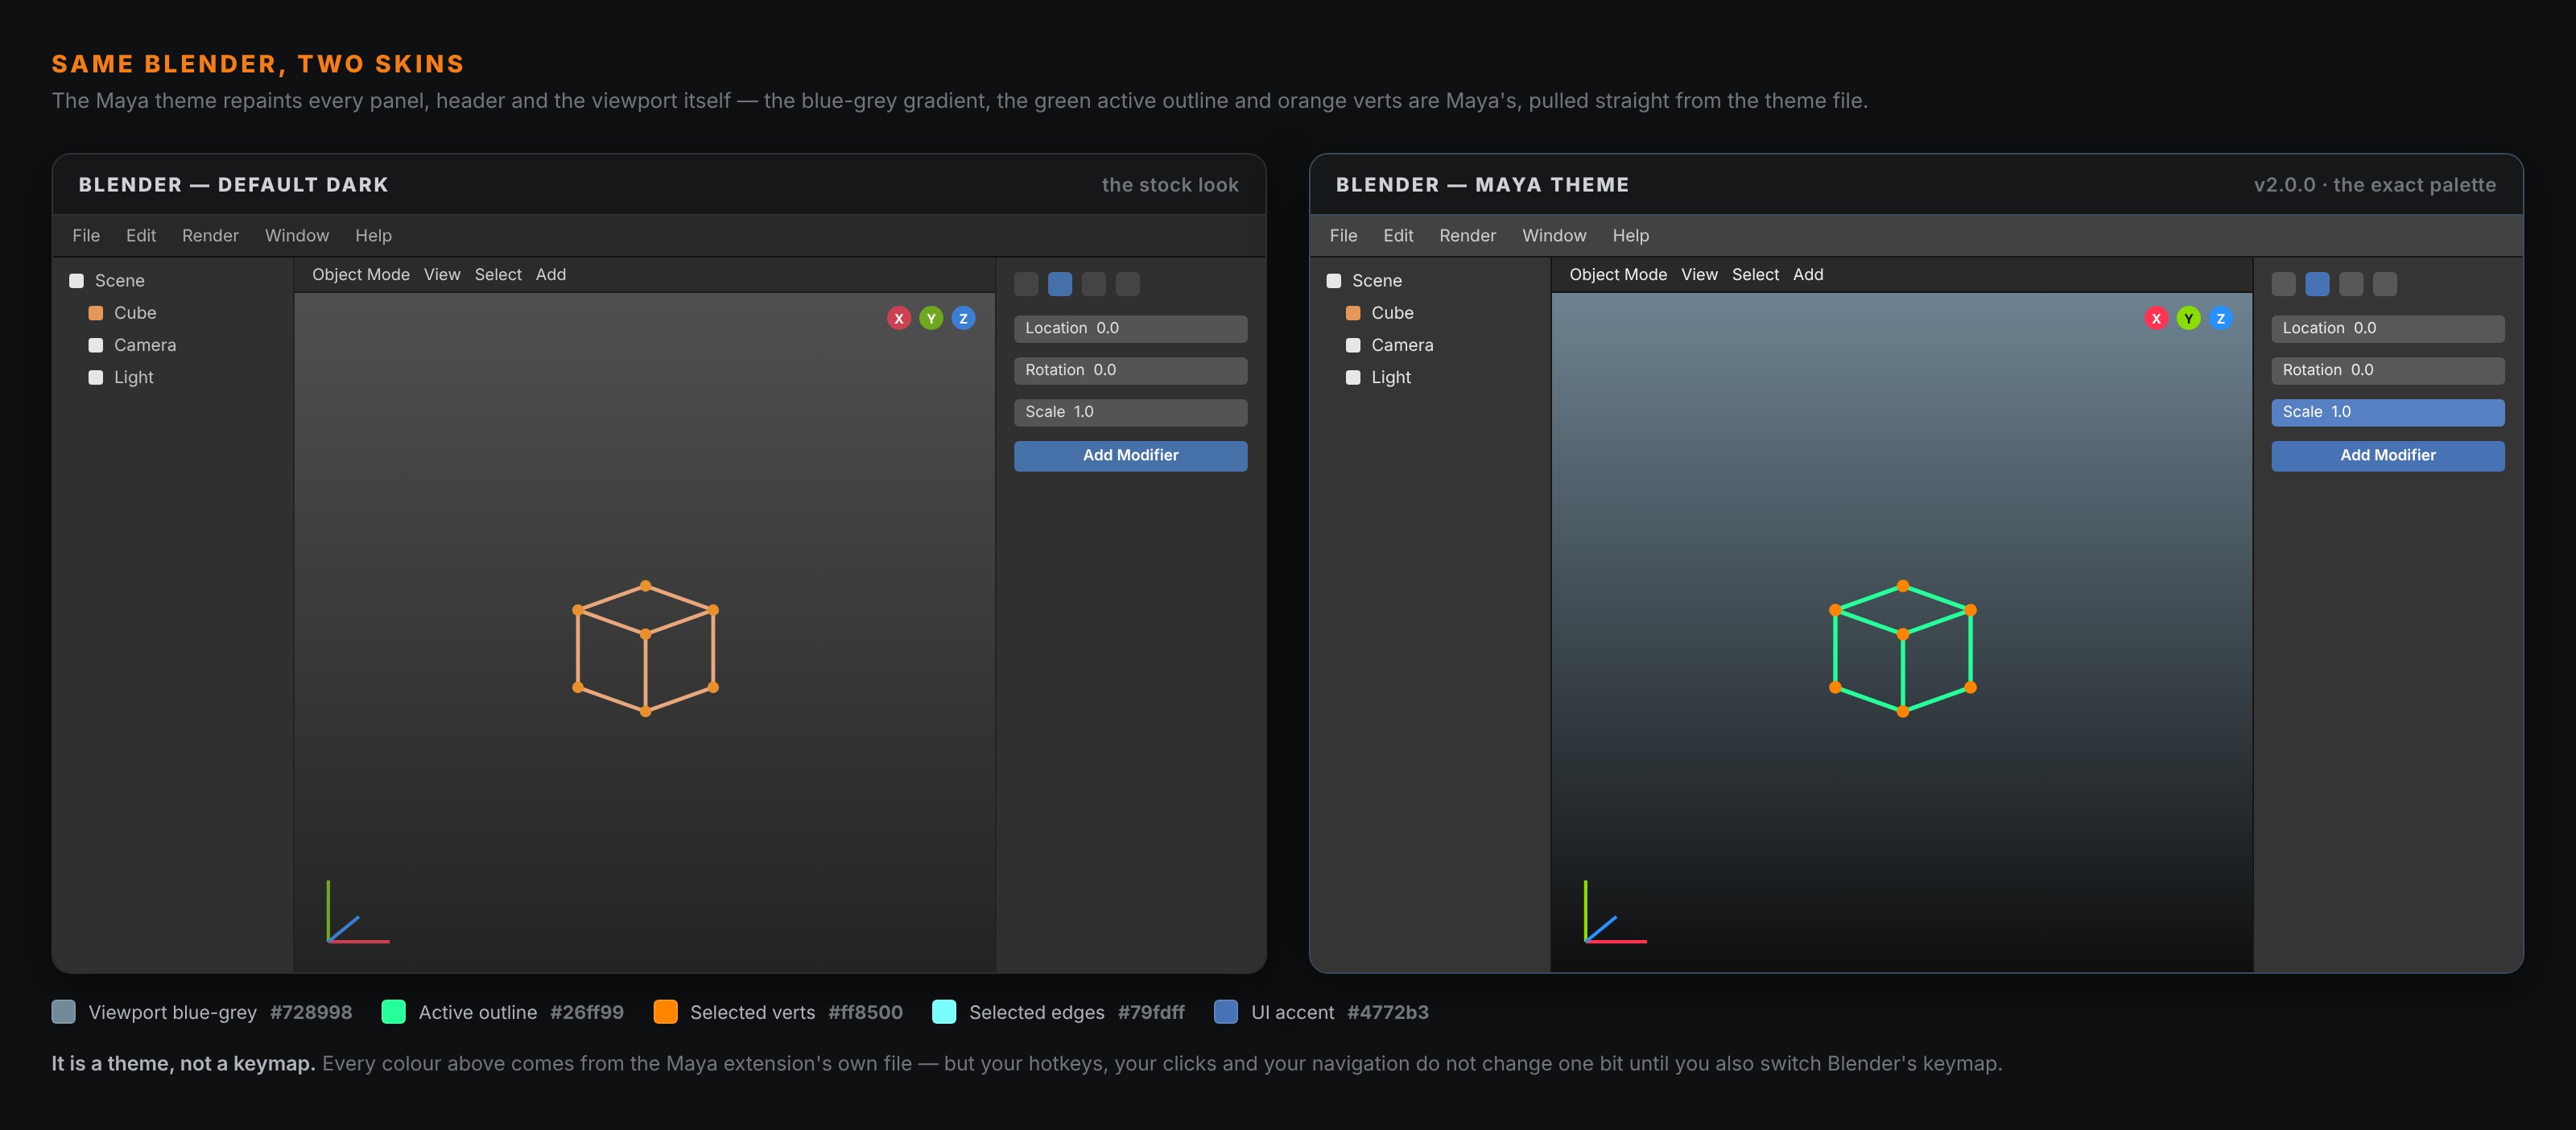
Both windows above are the same Blender. The only difference is a theme, and that is the whole lesson of this post in one picture: a theme does the colour — the look — and nothing else. The feel — the hotbox, the Channel Box, how you select and navigate and name things — is a completely separate problem that a theme cannot touch. So we will fix both halves, in order.
🎨 The Look — The Maya Theme
Start with the easy half. There is a community-made Maya theme that was, for years, a built-in Blender preset — it shipped inside the program right up to version 4.1. When Blender moved themes out to its extensions platform, this one went with it, and it now lives there as a free extension: version 2.0.0, for Blender 5.0 and newer, around 30,000 downloads, released under the GPL. It is officially no longer maintained — which sounds alarming but barely matters, because a theme is a static list of colours, not running code. There is nothing to break; it would only need attention if Blender invented a brand-new UI element with no colour assigned.
It is faithful. The blue-grey viewport gradient, the green active outline, the orange vertices, the cyan edges — every colour in that right-hand panel above came straight out of the theme's own file. One reviewer who has used Maya for over a decade called it "very accurate," and that matches what I see.
To install it: download the .zip from the extension page and drag it onto an open Blender window, or go to Edit → Preferences → Get Extensions, open the drop-down at the top-right, and choose Install from Disk. It then appears under Edit → Preferences → Themes, where you can select it, tweak any colour you dislike, and switch back to Blender Dark with one click. Nothing is permanent.
And then — the catch that trips up every switcher — you realise the theme changed the colours and not a single control. Blender now looks like Maya and still behaves exactly like Blender. That is the moment to go fix the other half.
⌨️ The Keymap In Between
Before the heavy option, there is a zero-install one that already ships with Blender: Edit → Preferences → Keymap, and at the top, change the dropdown from "Blender" to Industry Compatible.
That keymap was built specifically for people arriving from Maya and similar tools. It gives you left-click to select, Alt + left-drag to tumble the viewport the way Maya trained into you, and the common shortcuts sitting roughly where your hands expect them. While you are in Preferences, turn on Emulate Numpad (under Input) if you are on a laptop, so the top-row number keys drive the viewport angles.
The theme plus the Industry Compatible keymap is already a big step: the screen looks right and the basic gestures land right. But a keymap is still just keys. If you want the actual Maya environment — the hotbox, the Channel Box, the shelves — there is a tool for that too.
🧰 The Feel — The Maya Workflow Kit
The Maya Workflow Kit is a free, open-source Blender extension (GPL-3.0, pure Python, for Blender 5.2 LTS) that rebuilds Maya's workflow — not one piece of it, the whole set. It is independent of Autodesk, contains no Autodesk code or MEL scripts, does not need Maya installed, and has no network access. It simply reconstructs Maya's behaviour on top of Blender's own tools.
That "whole set" framing is what makes it different from everything before it. Other tools bring one piece across — a pivot tool, a shelf, a keymap. Maya does not feel like Maya because of any single feature; it feels like Maya because the hotbox, the Channel Box, the shelves and the navigation are one coherent environment. Rebuild them one at a time and you get a patchwork. Rebuild them together and the muscle memory comes back. Switched to Maya mode, the kit gives you:
- The hotbox — hold Space and every menu of the current menu set is under your cursor, exactly like Maya's.
- Marking menus — the radial, gesture-driven menus your hand already knows.
- The Channel Box and Attribute Editor — Maya's transform and attribute panels, in their familiar place, with their familiar keys.
- Menu sets, shelves and option windows — the Maya menu layout and option boxes carrying the same defaults Maya ships with.
- Maya navigation and pivot snapping — the tumble and snapping your hands do without thinking.
- Maya's scene concepts — Freeze Transformations, Delete History, Center Pivot, groups, centimetres as the working unit, and yes, objects that come in named pCube1.
That last group is the tell. Anyone can remap a hotkey; rebuilding Freeze Transformations and Delete History as real operations means someone reconstructed how a Maya artist actually thinks about a scene, not just which keys they press.
🔀 Nothing Changes Until You Choose Maya
Here is the design decision that makes the kit safe to install, and the reason I would hand it to a nervous switcher without hesitation. Enabling it changes nothing on its own. It adds a small Maya | Blender switch at the right of the top bar, one Edit-menu entry, a shortcut (Ctrl+Alt+Shift+M), and a one-time welcome dialog. Your keymap, theme, layout and preferences stay exactly as they were.
Only when you click "Make Blender feel like Maya" does it add its keys, menus, panels and the Maya layout — and even then it never writes your theme, preferences or active keymap. Click Blender in that switch and plain Blender is instantly back, same scene and all. That toggle is the killer feature: when a tutorial uses Blender's native shortcuts, flip to Blender, follow along, and flip back to keep working. You are never locked in, and removing the extension unregisters everything with nothing left to clean up.
To install it: download the newest maya-workflow-kit zip from the project's GitHub Releases page (the extensions.blender.org listing is not live yet), then use the same Get Extensions → Install from Disk step, or drag the zip onto Blender. Click Make Blender feel like Maya in the welcome dialog. Its entire footprint is your shelves and the Maya project folders you choose to create.
🧱 Where It Honestly Stops
Both tools are refreshingly upfront about their limits, and so am I. Some of Maya lives deeper than any Blender extension can reach, so a few things are deliberately not faked:
- Blender is Z-up with one pivot per object, where Maya is Y-up with flexible pivots. That is engine-level — it cannot be swapped out.
- No middle-mouse drag-to-scrub on a field. Instead there is a Python command line with a small maya.cmds look-alike for the hands that want a command.
- No MEL, and no operating-system docking of panels or side tabs.
Best touch in the kit: every Maya menu item Blender genuinely cannot do is still shown, greyed out, with a one-line note explaining why and what to use instead. Nothing silently vanishes — you are taught the gap rather than left to trip over it. That is exactly how a switcher should learn the places where Blender simply is its own program.
🎯 Putting It Together
So here is the full recipe. Install the Maya theme for the look. Add either the Industry Compatible keymap for a light-touch feel, or the Maya Workflow Kit for the whole Maya environment — hotbox, Channel Box, shelves and all. With all of it on, the window in front of you both looks like Maya and behaves like Maya, while plain Blender is always one shortcut away underneath.
But hold the honest framing in view: this is a bridge, not a cage. The goal is not to wear a Maya costume forever. It is to stay fast and confident on day one — to keep shipping work while your hands are still arguing with a new program — and then, every time you flip that switch to Blender for a tutorial, to learn a little more of the tool underneath. A theme and a keymap buy you comfort; fluency still comes from reps, on the same honest timeline any software switch takes. A Maya veteran who installs all this will be productive in an afternoon. A Maya veteran who installs it and keeps flipping the switch will, a few months in, quietly stop needing it.
The colour was never really the problem, and neither were the keys. But if a familiar viewport and a familiar hotbox are what keep you in the seat long enough to rebuild the muscle memory, they have done their job perfectly.
Read next: The Most Important Blender Keyboard Shortcuts for Beginners — the handful of keys worth burning into your hands first, whichever keymap you land on.
Making the jump from Maya and want a human to smooth the first few weeks? Book a free intro call → and share your screen. I work with artists switching from Maya constantly — a single session on the theme, the keymap, navigation and which Blender habits are actually worth keeping saves a lot of lonely fighting with the defaults.
Newsletter
Get more tips like this
Short, practical Blender guides for beginners — straight to your inbox. No spam. Unsubscribe any time.