Subdivision Surface in Blender: Stop It Melting Your Edges
2026-11-04
You model a crisp cube, add a Subdivision Surface modifier to smooth it, and it turns into a pillow. Add more levels and it becomes a sphere. Nothing is broken — this is exactly what subdivision is supposed to do, and once you understand why, the fix is one of the most useful ideas in all of hard-surface modelling.
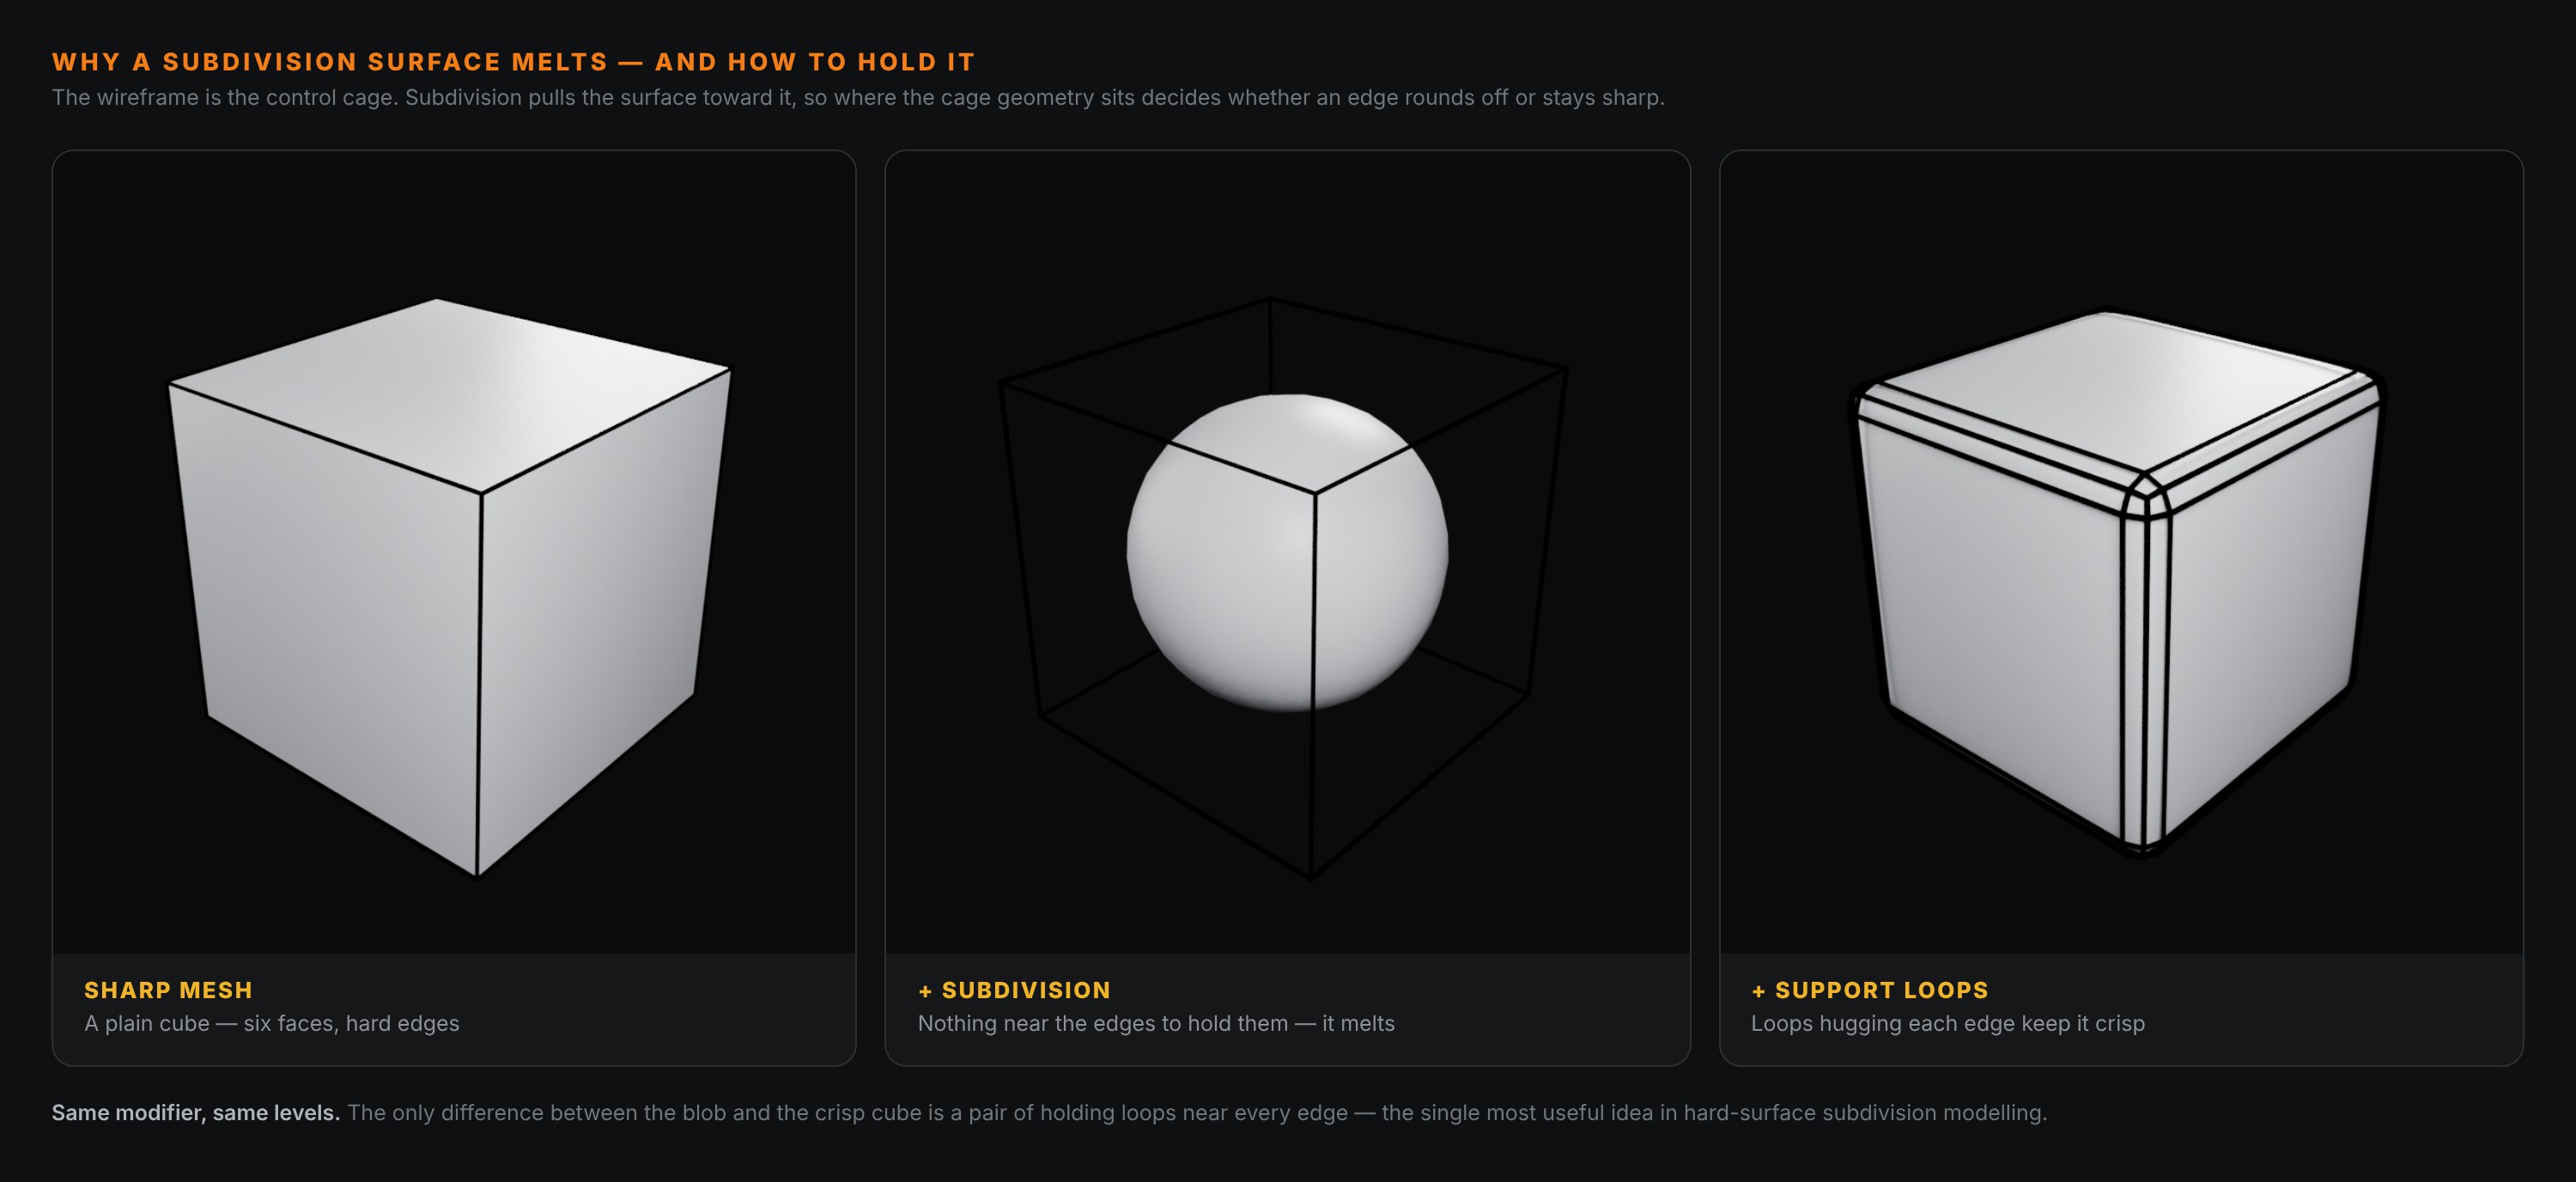
Look at the middle panel. The wireframe box is your original cube — the control cage. The sphere inside it is what subdivision made. The surface got pulled away from the cage, toward the average of the surrounding geometry, and a cube with no other geometry averages into a ball.
That is the whole mechanism. And the right-hand panel is the whole fix.
🫠 Why It Melts
Subdivision Surface (Catmull-Clark) does two things at once: it adds geometry, and it pulls the surface toward the average position of the nearby control points. On a cube, every corner's "nearby points" are the far corners of the cube, so the average of all that is... roughly a sphere.
The edges melt because there is nothing near them to anchor them. An edge stays sharp only if there is geometry close to it for the subdivision to average against. A bare cube edge has its nearest neighbours a whole face-width away, so the surface rounds off across that entire width.
More subdivision levels do not help — they make it smoother, which on an unsupported edge means rounder. The levels are not the problem. The spacing is.
🪢 Support Loops: The Fix
A support loop (also called a holding loop) is an edge loop placed close to an edge you want to keep sharp. It gives the subdivision nearby geometry to average against, so the surface holds tight instead of rounding across the whole face.
The rule is simple and worth memorising:
The closer the loop sits to an edge, the sharper that edge stays. Far loop, soft edge. Tight loop, crisp edge.
That is the entire craft of hard-surface subdivision: deciding which edges should be crisp, and placing loops near them. Everything else is mechanics.
🛠️ Four Ways To Add Them
1. Bevel the edge (Ctrl B)
Select the edge, bevel it with one or two segments. A bevel is a pair of support loops — it drops geometry on both sides of the edge automatically. For most hard-surface edges this is the fastest route, and it is what produced the crisp cube above.
2. Loop cuts (Ctrl R)
Hover near an edge, scroll to one cut, click, and slide the loop close to the edge. This is the manual, total-control version — useful when a bevel would add geometry you do not want elsewhere.
3. The Bevel modifier (non-destructive)
A Bevel modifier adds support loops to every hard edge at once, live, without committing the geometry. Set it to limit by angle so only your sharp edges get bevelled. It stacks before the Subdivision Surface modifier, and it is the cleanest way to work because you can keep adjusting the width. Pair it with its Harden Normals option to keep the shading crisp, which heads off the black-patch shading artifacts that bevelled subsurf edges can otherwise show.
4. Edge Crease (Shift E)
Select an edge and crease it — this tells the subdivision to hold that edge sharp without adding any geometry. It is instant and keeps the mesh light, but it gives less precise control over exactly how soft the edge is, and creases do not always travel well to other software. Good for quick work; support loops are more predictable for anything you will bake or export.
⚠️ The Mistakes
Loops too far from the edge. A support loop sitting in the middle of a face does nothing. It has to be close.
Triangles and n-gons near a loop. Subdivision wants quads. A triangle or five-sided face next to a support loop pinches the surface into a visible dent — the same topology discipline as quads versus triangles, and it shows up worst exactly where you are trying to hold an edge.
Applying subdivision too early. Keep it live as a modifier for as long as you can. Apply it and the geometry is baked in; your light, editable cage becomes a heavy mesh you cannot easily change.
Fighting a melting edge with more levels. If an edge is rounding, it needs a loop, not more subdivisions. Reach for geometry, not resolution.
🎮 Where This Fits In Game Art
Here is the part worth being clear about: you usually do not ship the subdivided mesh to a game engine. It is far too heavy.
Instead, subdivision is a high-poly tool. You model with a Subdivision Surface modifier and support loops to get a clean, smooth high-poly, and then — this is the pipeline — you retopologise to a light mesh and bake the subdivided detail onto it as a normal map. The crisp, rounded edges you held with support loops become the beautiful bevelled highlights in the bake, on a mesh of a few hundred faces.
So support loops are not just about making a pretty render. They are how you author the high-poly that your game-ready mesh gets its surface from. The whole hard-surface pipeline starts here.
🎯 The Underlying Idea
Subdivision does not know what you meant. It averages, relentlessly, toward smooth — and "smooth" with nothing to stop it means round. Every support loop is you telling it, locally, not here — hold this edge, keep this corner. Modelling with subdivision is a conversation between your intent and the algorithm's pull toward the blob, and support loops are how you win the argument, one edge at a time.
Once that clicks, the melting cube stops being frustrating and becomes obvious — of course it melted, you gave it nothing to hold onto. And the fix is always the same: get some geometry near the edge.
Read next: Retopology in Blender: Turning a Sculpt Into a Usable Mesh — the step after a subdivided high-poly, where it becomes a mesh an engine can run.
Hard-surface modelling and your edges keep melting or pinching? Book a free intro call → and share your screen. Support loops and edge flow are the kind of thing that takes one session to make permanent sense of, and a long time to piece together from forum threads.
Newsletter
Get more tips like this
Short, practical Blender guides for beginners — straight to your inbox. No spam. Unsubscribe any time.