Retopology in Blender: Turning a Sculpt Into a Usable Mesh
2026-11-04
A sculpt looks finished. It is often almost unusable.
Under the surface it is millions of chaotic triangles with no direction — a mesh you cannot rig, cannot UV cleanly, cannot animate, and cannot afford to put in a real-time scene. Retopology is the step that fixes that: rebuilding the same shape as a clean, low-poly mesh of quads that follow the form.
Here is what that actually means.
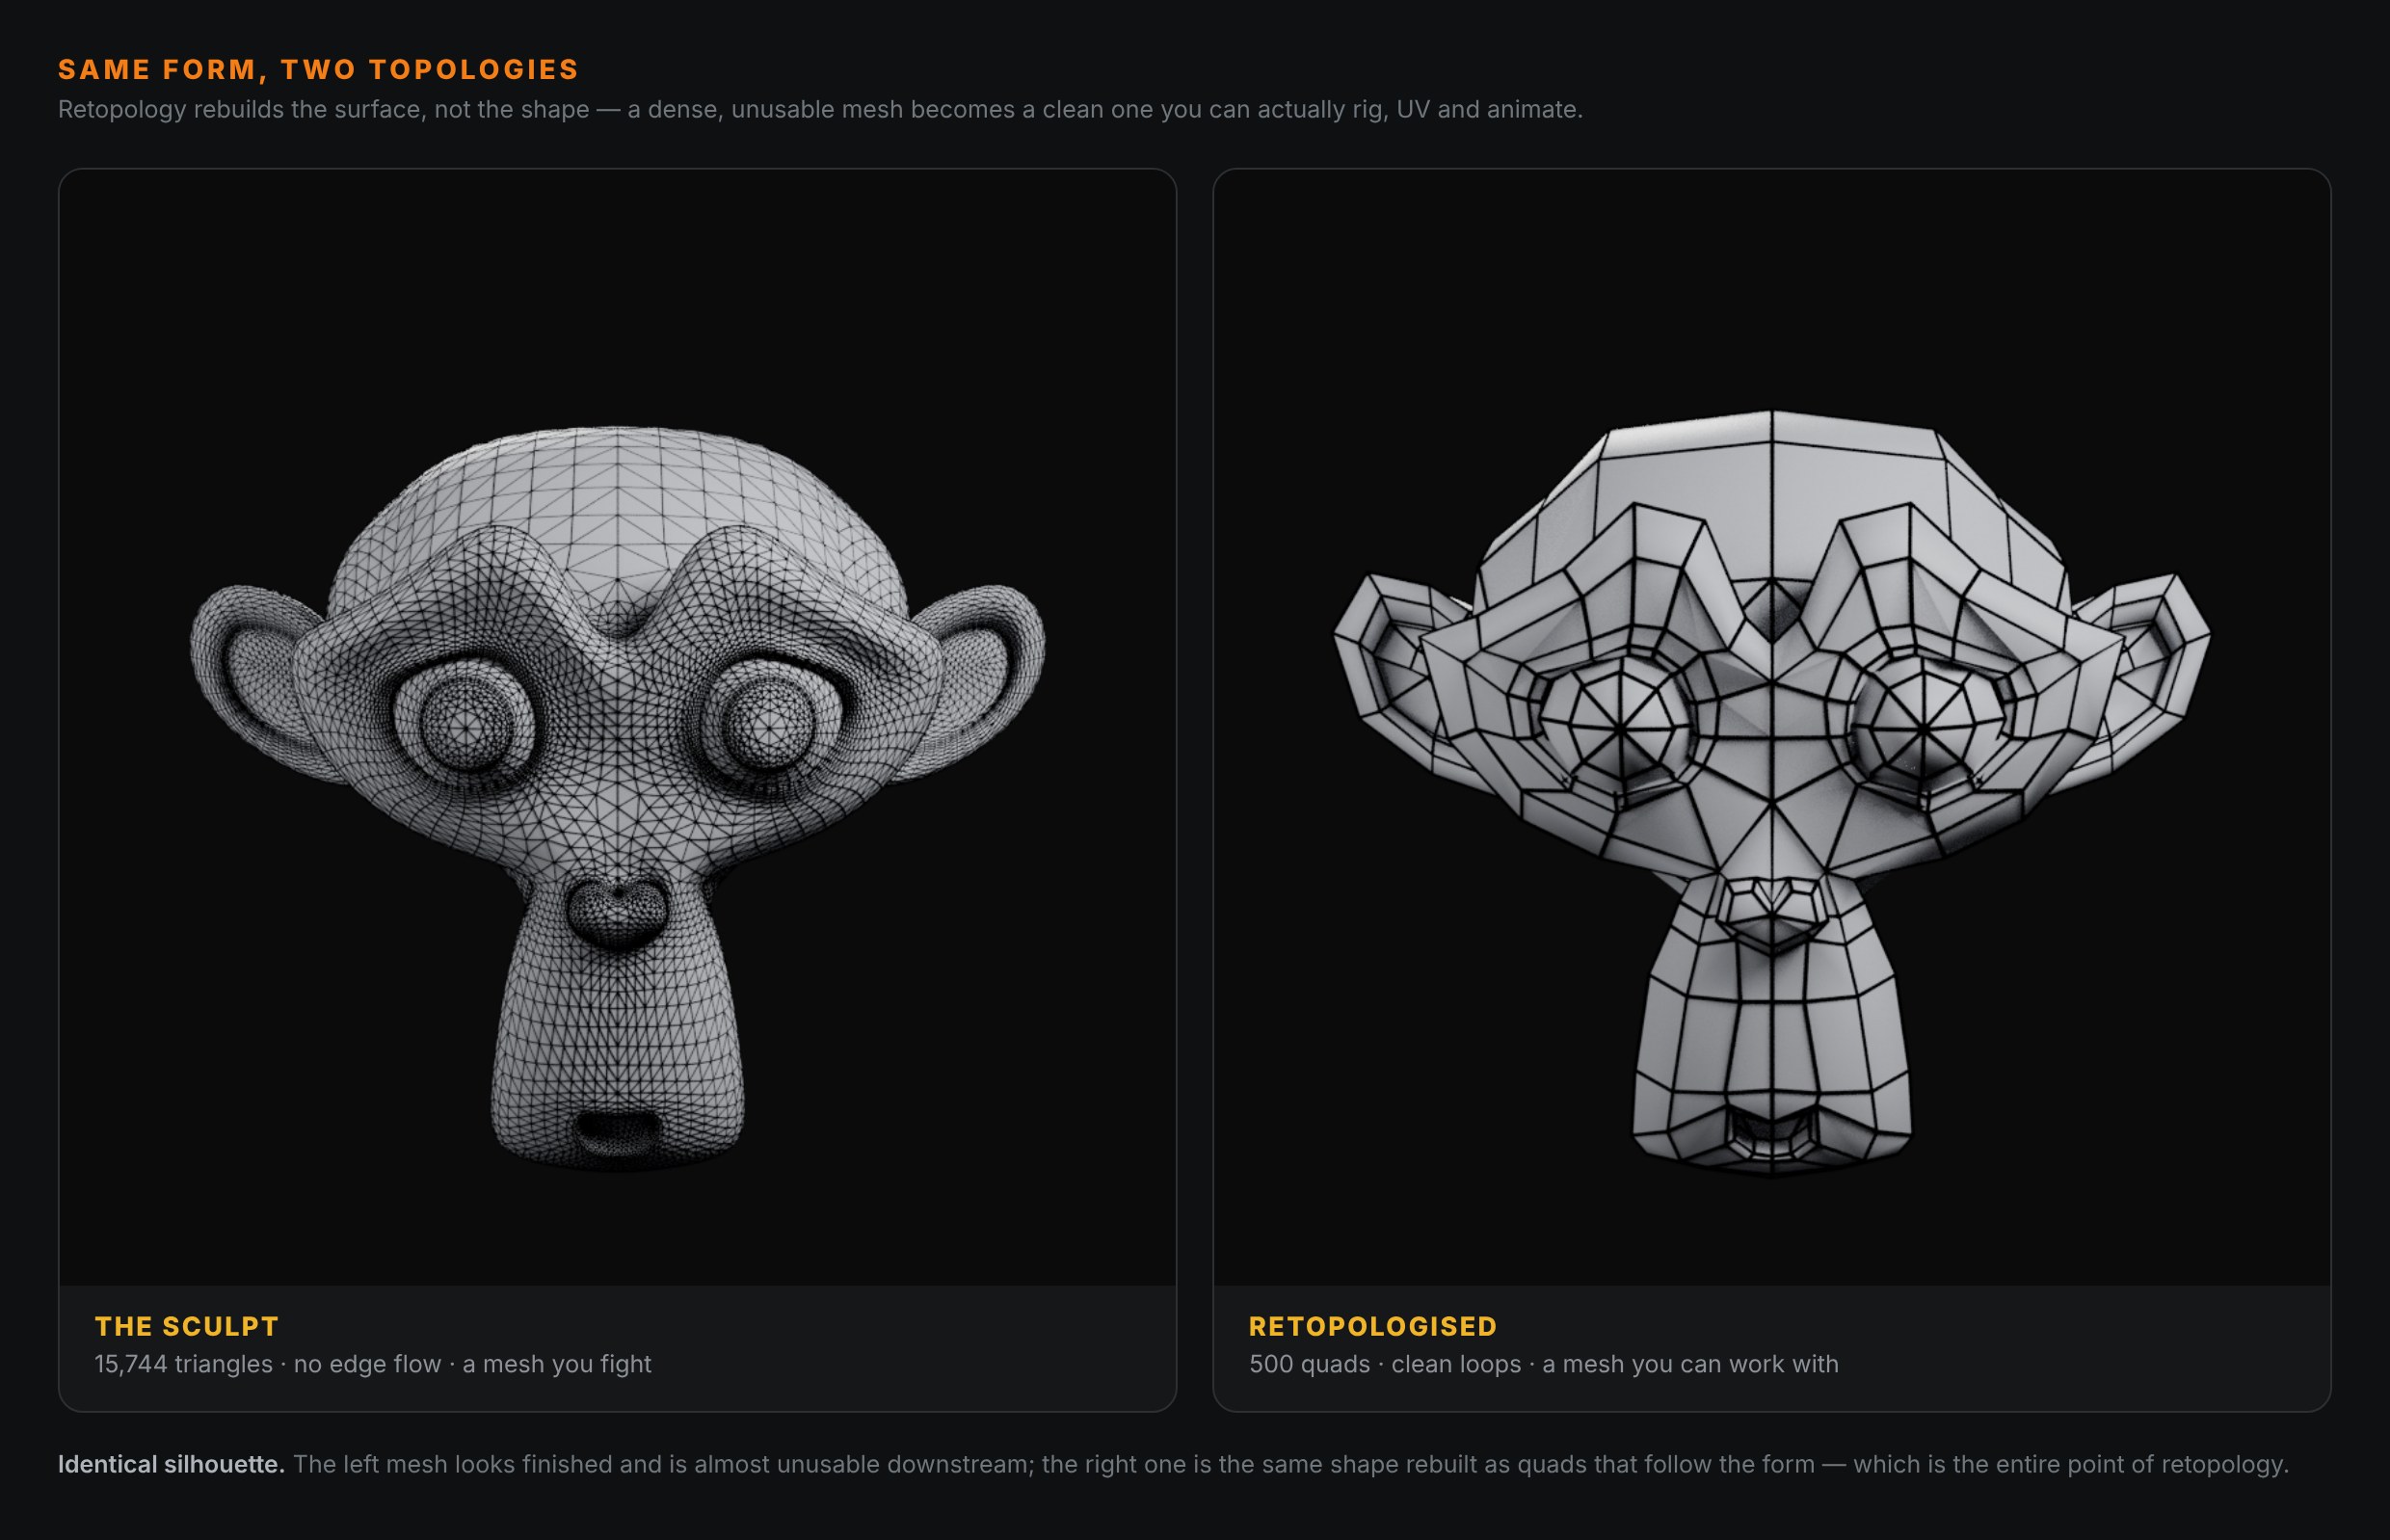
Identical silhouette. The left one looks done and is a nightmare downstream; the right one is the same shape rebuilt as quads you can work with. That is the whole job.
🧩 Why A Sculpt Can't Just Be Used
When you sculpt, Blender is giving you resolution, not structure. Every brush stroke adds triangles wherever it needs them, with no regard for edge flow — the orderly loops of geometry that tools like rigging, UV unwrapping and subdivision all depend on.
The result is a mesh that is:
- Too heavy. Millions of triangles no engine will run and no viewport enjoys.
- Impossible to edit. No loops to select, slide or cut — the same problem as any generated or scanned mesh with no topology.
- Bad at deforming. With no loops running around a joint, there is nothing for a rig to bend cleanly, which is exactly how a character ends up deforming badly.
- Miserable to UV. Triangle soup unwraps into fragmented islands with uneven texel density.
Retopology trades the sculpt's resolution for structure. You keep the shape; you replace the mesh.
🤔 When You Actually Need It
Not everything gets retopologised — doing it to a rock nobody looks at is wasted hours. The honest test is what the asset's future holds:
Retopologise when the asset will:
- Deform — anything rigged or animated needs loops to bend along.
- Be hand-textured — clean UVs need clean topology under them.
- Go into a real-time engine with a polygon budget.
- Be edited again — you will want loops to work with.
Leave it alone when it is a static prop, never deforms, is not going into an engine on a budget, and the poly count is irrelevant. A background rock generated or sculpted and never touched again is genuinely fine as it is. This is the same proportionality that governs quads versus triangles: topology matters most where the surface moves, and barely at all where it does not.
🛠️ How It's Done In Blender
There are three routes, from most control to least.
1. By hand, with Poly Build and Shrinkwrap (free, built in)
The traditional way, and the one that teaches you the most. The trick is two modifiers on a fresh mesh:
- A Shrinkwrap modifier, targeting your sculpt, so every vertex you place snaps onto the sculpt's surface.
- Surface Snapping on, so the new geometry hugs the form as you draw it.
Then you use the Poly Build tool to click quads into existence directly on the surface, following the form. It is slow and deliberate, and it gives you total control over where every loop goes — which, for a face or a hero character, is control you want.
2. With an add-on (faster, still manual)
RetopoFlow (a dedicated retopology toolkit) and Quad Remesher (auto, paid) exist because hand-retopo is time-consuming. RetopoFlow keeps the manual control but makes it far quicker; Quad Remesher produces usable automatic quad topology in one click. For production work, most people reach for one of these.
3. QuadriFlow Remesh (one click, built in, free)
Blender ships an automatic quad retopologiser: Object ▸ Quad Remesh (QuadriFlow). You give it a target face count and it rebuilds the mesh in quads. It is genuinely useful for props and hard-surface shapes. It is not smart about where loops need to go for deformation, so for a face, hands, or anything that bends, it is a starting point at best — you still place the important loops yourself.
🌀 Where The Loops Go
This is the skill, and it is worth stating simply: edge loops should follow the form and follow the deformation.
On a face, loops run around the eyes and around the mouth, because that is how a real face creases when it moves. On a limb, loops run around the joint — three or so at an elbow or knee — so the surface has somewhere to fold. On a hard-surface panel, loops hold the hard corners sharp.
A good retopo is not the one with the most polygons. It is the one where the polygons are in the right places and absent everywhere else. Flat areas want almost nothing; areas that bend or hold detail want loops.
🔗 Retopo Then Bake
Here is how the whole pipeline fits together, because retopology is rarely the end of it.
You sculpt the detail. You retopologise to get a clean, light mesh. Then you bake the sculpt's detail onto that clean mesh as a normal map — so the low-poly keeps all the surface richness of the sculpt without any of the geometry. Retopology and normal-map baking are two halves of one move: the retopo gives you a mesh an engine can run, and the bake gives it back the detail you rebuilt it away from.
Skip the retopo and the bake has nothing clean to project onto. They go together.
⚠️ The Mistakes That Waste The Effort
Making the retopo too dense. It is meant to be low-poly. If your "retopologised" mesh is still 200k triangles, you have rebuilt the problem. Aim for the lowest count that holds the silhouette and the loops you need.
Triangles and poles in deforming areas. A stray triangle on a flat panel is harmless; one on a cheek or a knuckle pinches when it moves. Keep the deforming zones clean quads.
Ignoring the silhouette. The retopo must sit on the sculpt. If it drifts off the surface, you lose the shape you sculpted — Shrinkwrap exists precisely to stop this, so use it.
Retopologising too early. Finish the sculpt first. Retopo over a form you are still changing and you will just do it twice.
🎯 The Underlying Idea
Sculpting and retopology answer two different questions. Sculpting asks what does it look like. Retopology asks how is it built. A sculpt can be beautiful and still be built wrong for everything that comes after it — and "built wrong" is invisible in a render, right up until you try to rig it, texture it, or load it into an engine.
So retopology is the moment a sculpt stops being a nice image and becomes an asset. It is unglamorous, it is most of the gap between hobby work and production work, and it is one of the clearest skills a portfolio can show a studio: clean topology says you understand that the mesh has to live a life after the pretty render.
Read next: Blender Normal Map Baking: Why Yours Comes Out Wrong — the step straight after retopo, where the sculpt's detail gets projected back onto your clean mesh.
Staring at a sculpt and not sure where the loops should go? Book a free intro call → and bring it. Edge flow is one of those things that takes ten minutes to grasp with someone drawing it on your own model, and a long time to guess at alone.
Newsletter
Get more tips like this
Short, practical Blender guides for beginners — straight to your inbox. No spam. Unsubscribe any time.