Blender to Unity: Export Without the Scale and Rotation Mess
2026-11-03
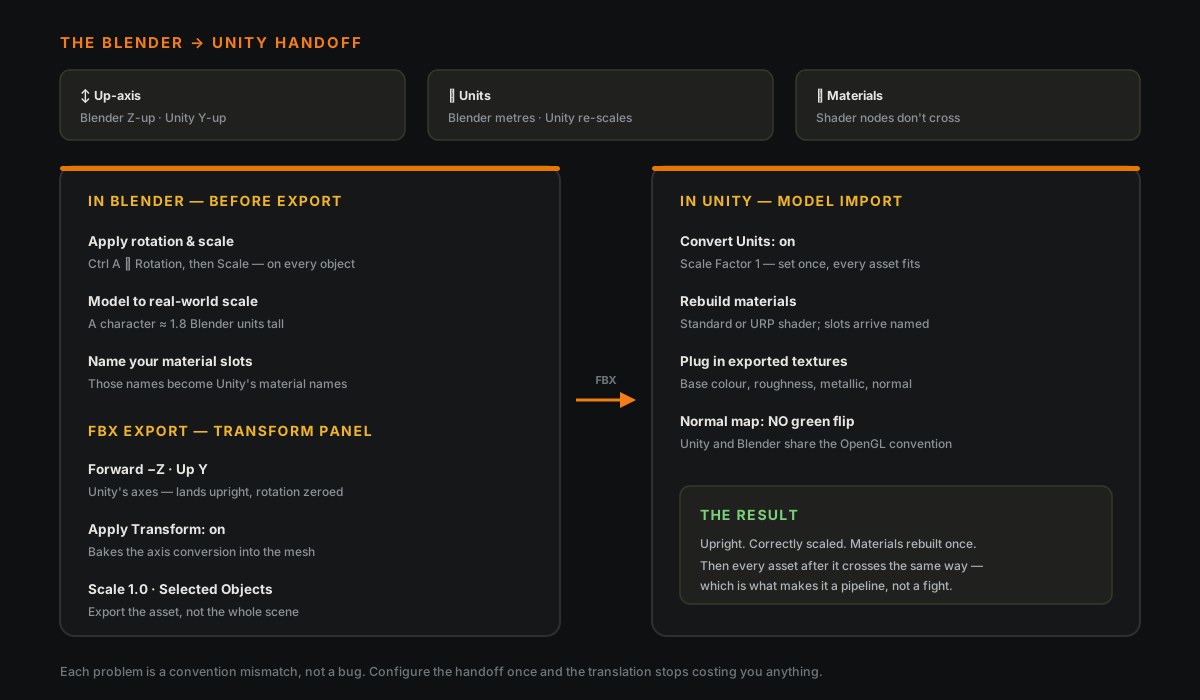
You export a model from Blender, drag it into Unity, and it arrives lying on its back, a hundred times too small, with no materials. Nothing is broken — Blender and Unity just disagree about three things, and if you settle all three once, every asset after it comes in clean.
Here is what to set, on both ends.
🧭 Problem One: It Lands On Its Back
Blender treats Z as up. Unity treats Y as up. So a model that stands upright in Blender arrives in Unity rotated 90° onto its back — or, worse, it looks upright but carries a hidden −90° rotation on its transform that fights you the moment you parent or animate it.
The clean fix is in the FBX exporter, not in hacks. When you export, open the Transform section and set:
- Forward: −Z Forward
- Up: Y Up
- Apply Transform: on
Those are Unity's conventions. With them set, the asset lands upright and with a clean, zeroed rotation on its transform — which is the part most "rotate it −90, apply, rotate it back" tricks get wrong. Apply Transform bakes the axis conversion into the mesh data so Unity does not have to guess.
Before you export at all, apply your rotations in Blender — select the object and Ctrl A ▸ Rotation. An object carrying an unapplied rotation is the single most common reason things arrive crooked, and it is the same discipline that keeps FBX exports from arriving wrong in general.
📏 Problem Two: It Is Tiny (Or Enormous)
This one has two layers, which is why it is confusing.
Layer one — Blender. If your object has an unapplied scale (you resized it in Object Mode and never committed it), the FBX carries that scale as a transform rather than as real size. Apply it: Ctrl A ▸ Scale. Now the mesh's actual dimensions live in the geometry.
Layer two — the unit mismatch. Blender works in metres and writes that into the FBX. Unity's FBX importer then applies its own Scale Factor and a Convert Units option, and the interaction between the two is what makes a 2-metre character turn up at 2cm or 200m.
The reliable recipe: model to real-world scale in Blender (a character around 1.8 Blender units tall), apply scale before export, leave the exporter's scale at 1.0, and in Unity's import settings tick Convert Units and leave Scale Factor at 1. Set it once, and every asset built to real scale comes in right. Guessing a Scale Factor per-model is how you end up with a scene where nothing matches anything.
🎨 Problem Three: The Materials Are Gone
They are not gone, exactly — they just do not survive the trip in any useful form, and expecting them to is the mistake.
Unity does not run Blender's shader nodes. An FBX can carry basic material slots and a base colour, but your careful Principled BSDF setup, your node tree, your procedural textures — none of it crosses. Plan to rebuild materials in Unity.
What actually transfers cleanly is textures as image files. So the workflow that works:
- In Blender, make sure every surface is a separate material slot with a sensible name — those names come across and become your Unity material names.
- Export your texture maps as files (base colour, roughness, metallic, and your baked normal map).
- In Unity, create materials with the Standard or URP shader and plug those maps in.
One genuinely good piece of news: Unity uses the OpenGL normal-map convention, and so does Blender. So unlike the trip to Unreal, your baked normal map needs no green-channel flip — it just works. That single compatibility is why a lot of people find the Blender-to-Unity texture path smoother than they expected.
🗂️ .blend Or FBX?
Unity can import a .blend file directly — drop it in your Assets folder and, if Blender is installed on the machine, Unity converts it behind the scenes. It is convenient for a solo prototype where the file changes constantly.
For anything real, export FBX. The direct-.blend path breaks the moment a teammate without Blender opens the project, or Blender updates and the converter lags, or you need precise control over what exports. FBX is explicit, portable, and does not depend on a Blender install existing wherever the project is opened. Convenience now, a broken import later — the trade is rarely worth it past a prototype.
✅ The Settings, In One Place
In Blender, before export:
- Apply rotation and scale (Ctrl A), on every object going across.
- Name your material slots — those names become Unity's.
- Model to real-world scale.
In the FBX exporter (Transform panel):
- Forward −Z Forward, Up Y Up, Apply Transform on.
- Scale 1.0.
- Limit to Selected Objects so you export the asset and not the whole scene.
In Unity's model import settings:
- Convert Units on, Scale Factor 1.
- Rebuild materials with the Standard/URP shader.
- Plug in your exported textures; the normal map needs no green flip.
🎯 Why It Is Worth Settling Once
Every one of these three problems is a convention mismatch, not a bug — two programs that each made a reasonable choice and chose differently. Up-axis, units, materials. You cannot argue either side out of its choice, but you can configure the handoff so the translation happens automatically, once, and then stops costing you anything.
That is what separates a pipeline from a pile of exports. A pipeline is a set of decisions you made once so you never have to think about them again — and the Blender-to-Unity handoff is one of the most worthwhile to nail down, because you will cross it on every single asset you make.
It is the same relationship Blender has with Unreal Engine, just with Unity's conventions in the other two columns. Author in Blender, assemble in the engine. Neither tries to be the other, and that is exactly why the pairing works.
Read next: Blender Normal Map Baking: Why Yours Comes Out Wrong — the textures that do cross to Unity are only as good as the bake that made them.
Setting up a Blender-to-Unity pipeline for a real project? Book a free intro call →. Getting the export and import settings right once, together, saves the week of "why is everything sideways" that most people spend learning it the hard way.
Newsletter
Get more tips like this
Short, practical Blender guides for beginners — straight to your inbox. No spam. Unsubscribe any time.