Blender Normal Map Baking: Why Yours Comes Out Wrong
2026-11-03
Baking a normal map is the trick that makes game art possible: you sculpt a million triangles of detail, then project it onto a low-poly cage of a few thousand that an engine can actually run. Done right, the low-poly looks almost identical to the sculpt. Done wrong, you get a purple smear, skewed streaks, or dents where the bumps should be.
Here is the thing working, then everything that stops it working.
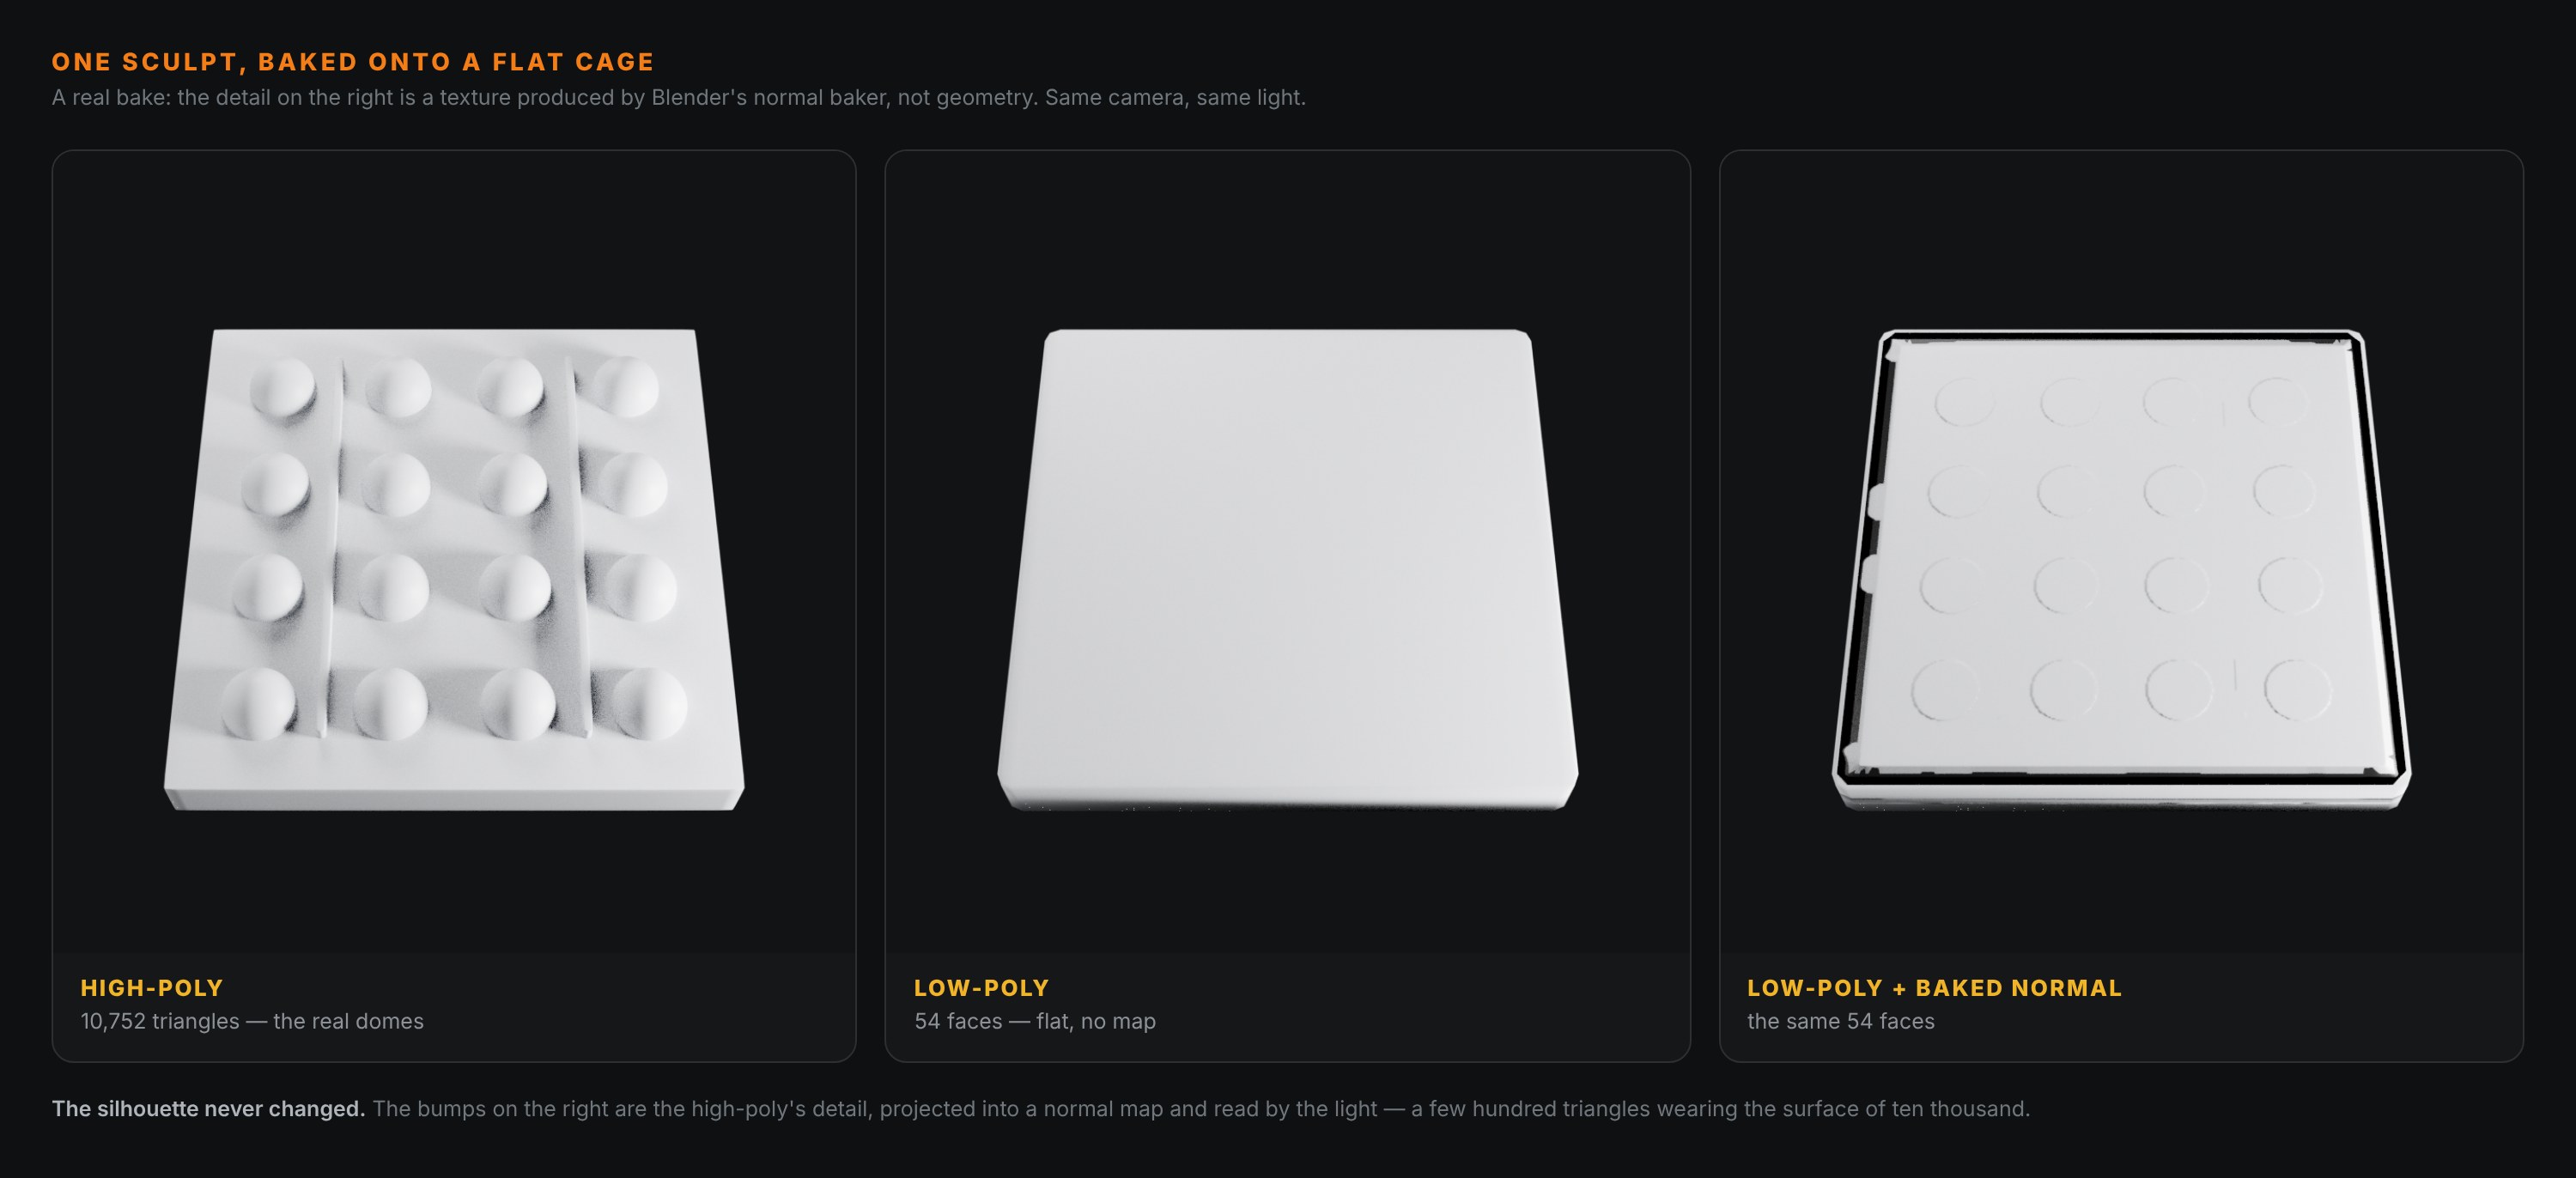
That third panel is a few thousand triangles. It only looks like the first one because the surface detail is being faked by a texture — the normal map — that tells the renderer which way the surface points at every pixel, without any of the geometry actually being there.
🔧 What Baking Actually Does
A normal map is an image where the red, green and blue of each pixel encode a direction rather than a colour. When the renderer shades your low-poly surface, it reads that direction and lights the pixel as if the surface faced that way — so a flat polygon can look dented, bolted, scratched or panelled.
Baking is the step that produces that image. Blender fires rays from the low-poly surface outward, finds the high-poly surface they hit, measures which way it faces, and writes that direction into the texture at the matching UV coordinate. Two meshes go in — your detailed one and your game-ready one — and one image comes out.
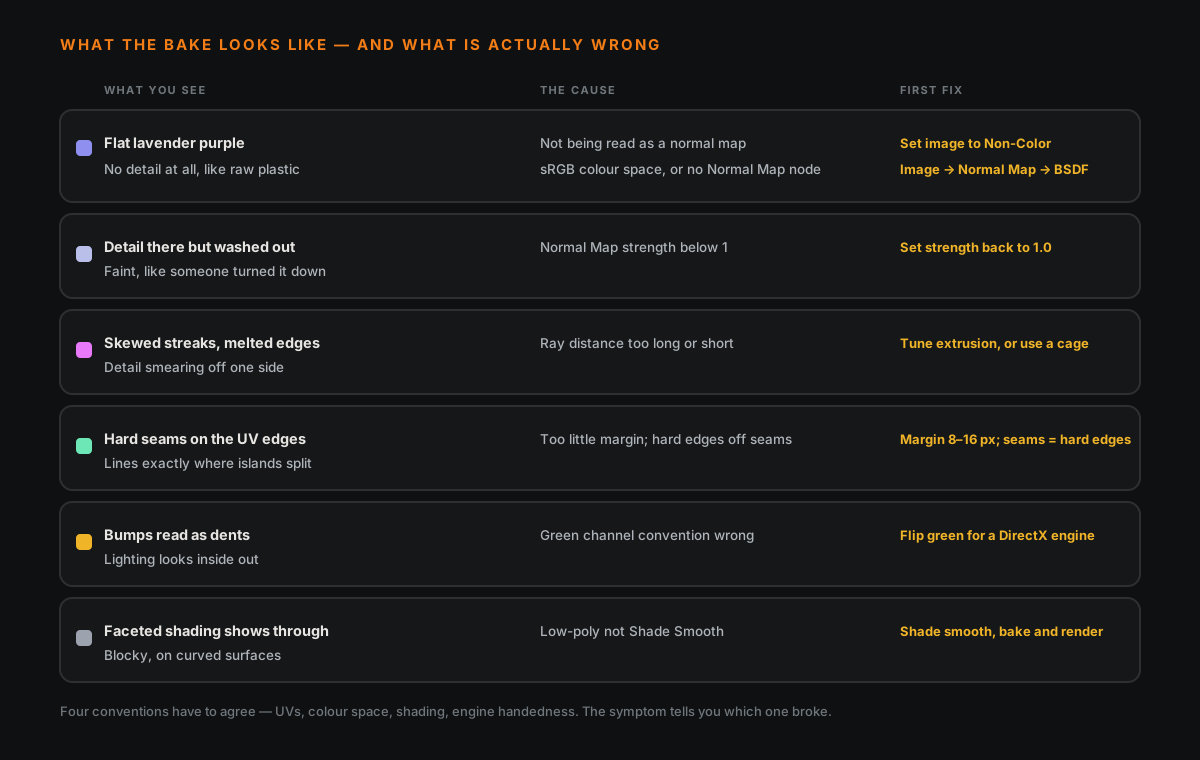
Almost every baking problem is one of three things: the rays missing or mis-hitting, the image being interpreted wrong, or the two meshes disagreeing about what "flat" means. Here is the map.
🟣 The Surface Is Flat Purple
Flat lavender-purple, no detail at all, is a normal map that is loaded but not being read as a normal map.
The single most common cause: the image is set to sRGB colour space. A normal map is data, not a picture — its "colours" are coordinates — so colour management must not touch it. Set the Image Texture node's colour space to Non-Color. This is the same class of mistake that makes materials look like plastic: colour space quietly corrupting a map that was never meant to be seen.
The other cause: the Normal Map node is missing. An image texture plugged straight into the Principled BSDF's Normal input does nothing useful — the pixels have to pass through a Normal Map node first, which converts those stored directions into the shading the BSDF expects. Image Texture → Normal Map → Normal. In that order, always.
🫥 The Detail Is There But Washed Out
Faint, flat, like the bake took but someone turned it down. Two usual suspects:
Strength. The Normal Map node has a Strength value. At 1.0 it is accurate; below that it fades. If someone set it to 0.2 to "tone it down," that is your washout. Put it back to 1.0 — a normal map is measured, not seasoned.
Colour space, again, the other way. If the map reads correctly but looks weak, confirm it is genuinely Non-Color and that you did not accidentally bake into an 8-bit image when the detail needed more range. For most game work 8-bit is fine; the washout is almost always strength or colour space, not bit depth.
💥 Skewed Streaks And Exploded Artifacts
Long smears pulling off the edges, or detail that looks melted sideways. This is the ray distance — the single most fiddly setting in baking.
The rays travel a fixed distance looking for the high-poly surface. Too short and they fall short of the detail, leaving holes. Too long and a ray fired near one edge punches through and hits the high-poly on the other side of the model, writing that far surface's direction into the wrong place — which reads as a skewed streak.
Two ways to fix it:
- Tune the Extrusion and Max Ray Distance under the bake settings until the smears vanish. On a simple object this is quick trial and error.
- Use a cage. A cage is an inflated copy of your low-poly that defines exactly how far the rays go, per-vertex. On anything with varying thickness — a character, a prop with both thick and thin parts — a cage is the difference between a clean bake and an afternoon of fighting ray distance. It is worth learning early.
🧵 Visible Seams Along The UV Edges
Hard lines exactly where your UV islands split. The bake is fine; the problem is at the edges of the islands.
Add bake margin. The bake can bleed a few pixels of colour past each island's edge, so that when the texture is filtered and mip-mapped at distance, the background colour does not creep in. Set the Margin to 8–16 pixels. Zero margin guarantees seams.
Match your hard edges to your UV seams. Every hard edge (a sharp 90° corner you have marked sharp, or a face with split normals) should sit on a UV seam, and every UV seam should ideally be a hard edge. When a hard edge runs through the middle of a UV island, the bake has to store an abrupt direction change in the texture, and that is where seams and gradients show up. This is the same discipline that keeps UV unwrapping from becoming guesswork.
🔃 The Bumps Are Dents (And Dents Are Bumps)
Everything looks baked correctly, but the lighting is inside out — raised bolts read as holes, panel grooves read as ridges. This one catches everybody exactly once.
It is the green channel. There are two conventions for which way "up" points in a normal map:
- OpenGL (+Y): used by Blender, Unity, Godot, Toolbag.
- DirectX (−Y): used by Unreal Engine, 3ds Max, Substance's DirectX export.
Blender bakes OpenGL. If you take that map into Unreal — which expects DirectX — every surface's vertical direction is flipped, and the shading inverts. The fix is to flip the green channel: either tick "Flip Green" on Unreal's texture import, or invert the G channel in the compositor before export.
So the rule when your bake looks inverted: you have not baked it wrong, you have handed an OpenGL map to a DirectX engine. It is the same tax as scale and rotation on FBX export — a convention mismatch between two programs, not a mistake in Blender.
🧊 The Low-Poly's Own Shading Shows Through
Faceted, blocky shading bleeding through the detail, especially on curved surfaces. The low-poly and the bake disagree about the base surface.
A tangent-space normal map is stored relative to the low-poly's own smooth shading. So the low-poly must be set to Shade Smooth when you bake and when you render — if you bake smooth and render flat, or change the smoothing after baking, the map is now relative to a surface that no longer exists, and the facets reappear.
For hard-surface models, the clean approach is shade smooth plus a Weighted Normal modifier, or split normals on your genuine hard edges — so the low-poly's shading is already close to the high-poly's, and the normal map only has to store the difference. A map that only stores the difference is a map with fewer artifacts.
🧰 The Thirty-Second Checklist
Before you bake, and when a bake goes wrong, in order:
- Low-poly is Shade Smooth, with hard edges on UV seams only.
- UVs are unwrapped with a little space between islands.
- A new image is created and assigned, set to Non-Color.
- Low-poly selected, high-poly also selected, low-poly active — the active object is what gets baked to.
- Selected to Active is ticked, with a sane Ray Distance or a cage.
- Margin at 8–16 px.
- After baking: Image Texture (Non-Color) → Normal Map node → BSDF Normal, strength 1.0.
- Going to Unreal? Flip the green channel.
🎯 Why It Goes Wrong So Often
Baking sits at the intersection of four things that each have their own conventions — UVs, colour space, shading, and engine handedness — and it only looks right when all four agree. Miss one and you do not get an error; you get a plausible-looking texture that is subtly wrong, and "subtly wrong" is the hardest kind of problem to diagnose because nothing tells you which of the four it is.
So you read the symptom. Purple means colour space. Streaks mean ray distance. Seams mean margins and hard edges. Inverted means green channel. The surface on your screen has already told you which of the four to go and check — the same lesson as a texture that will not show at all, one step further down the pipeline.
Get it right and you have the core move of all game art: the detail of a sculpt, at the cost of a few thousand triangles. That trade is most of what makes a real-time scene possible.
Read next: Quads vs Triangles in Blender: What Actually Matters — because the low-poly you bake onto is only as good as its topology, and this is where that starts.
Baking a specific asset and it will not come clean? Book a free intro call → and bring both meshes. Ninety per cent of bad bakes are one of the five above, and they are far faster to spot with someone looking at your ray distance and your node tree with you.
Newsletter
Get more tips like this
Short, practical Blender guides for beginners — straight to your inbox. No spam. Unsubscribe any time.