Texel Density in Blender: Why Your Textures Look Uneven
2026-11-04
Two assets in the same scene. One looks crisp; the one next to it looks soft and low-resolution. Both have perfectly good textures. The difference is texel density — and once you can see it, you cannot unsee it.
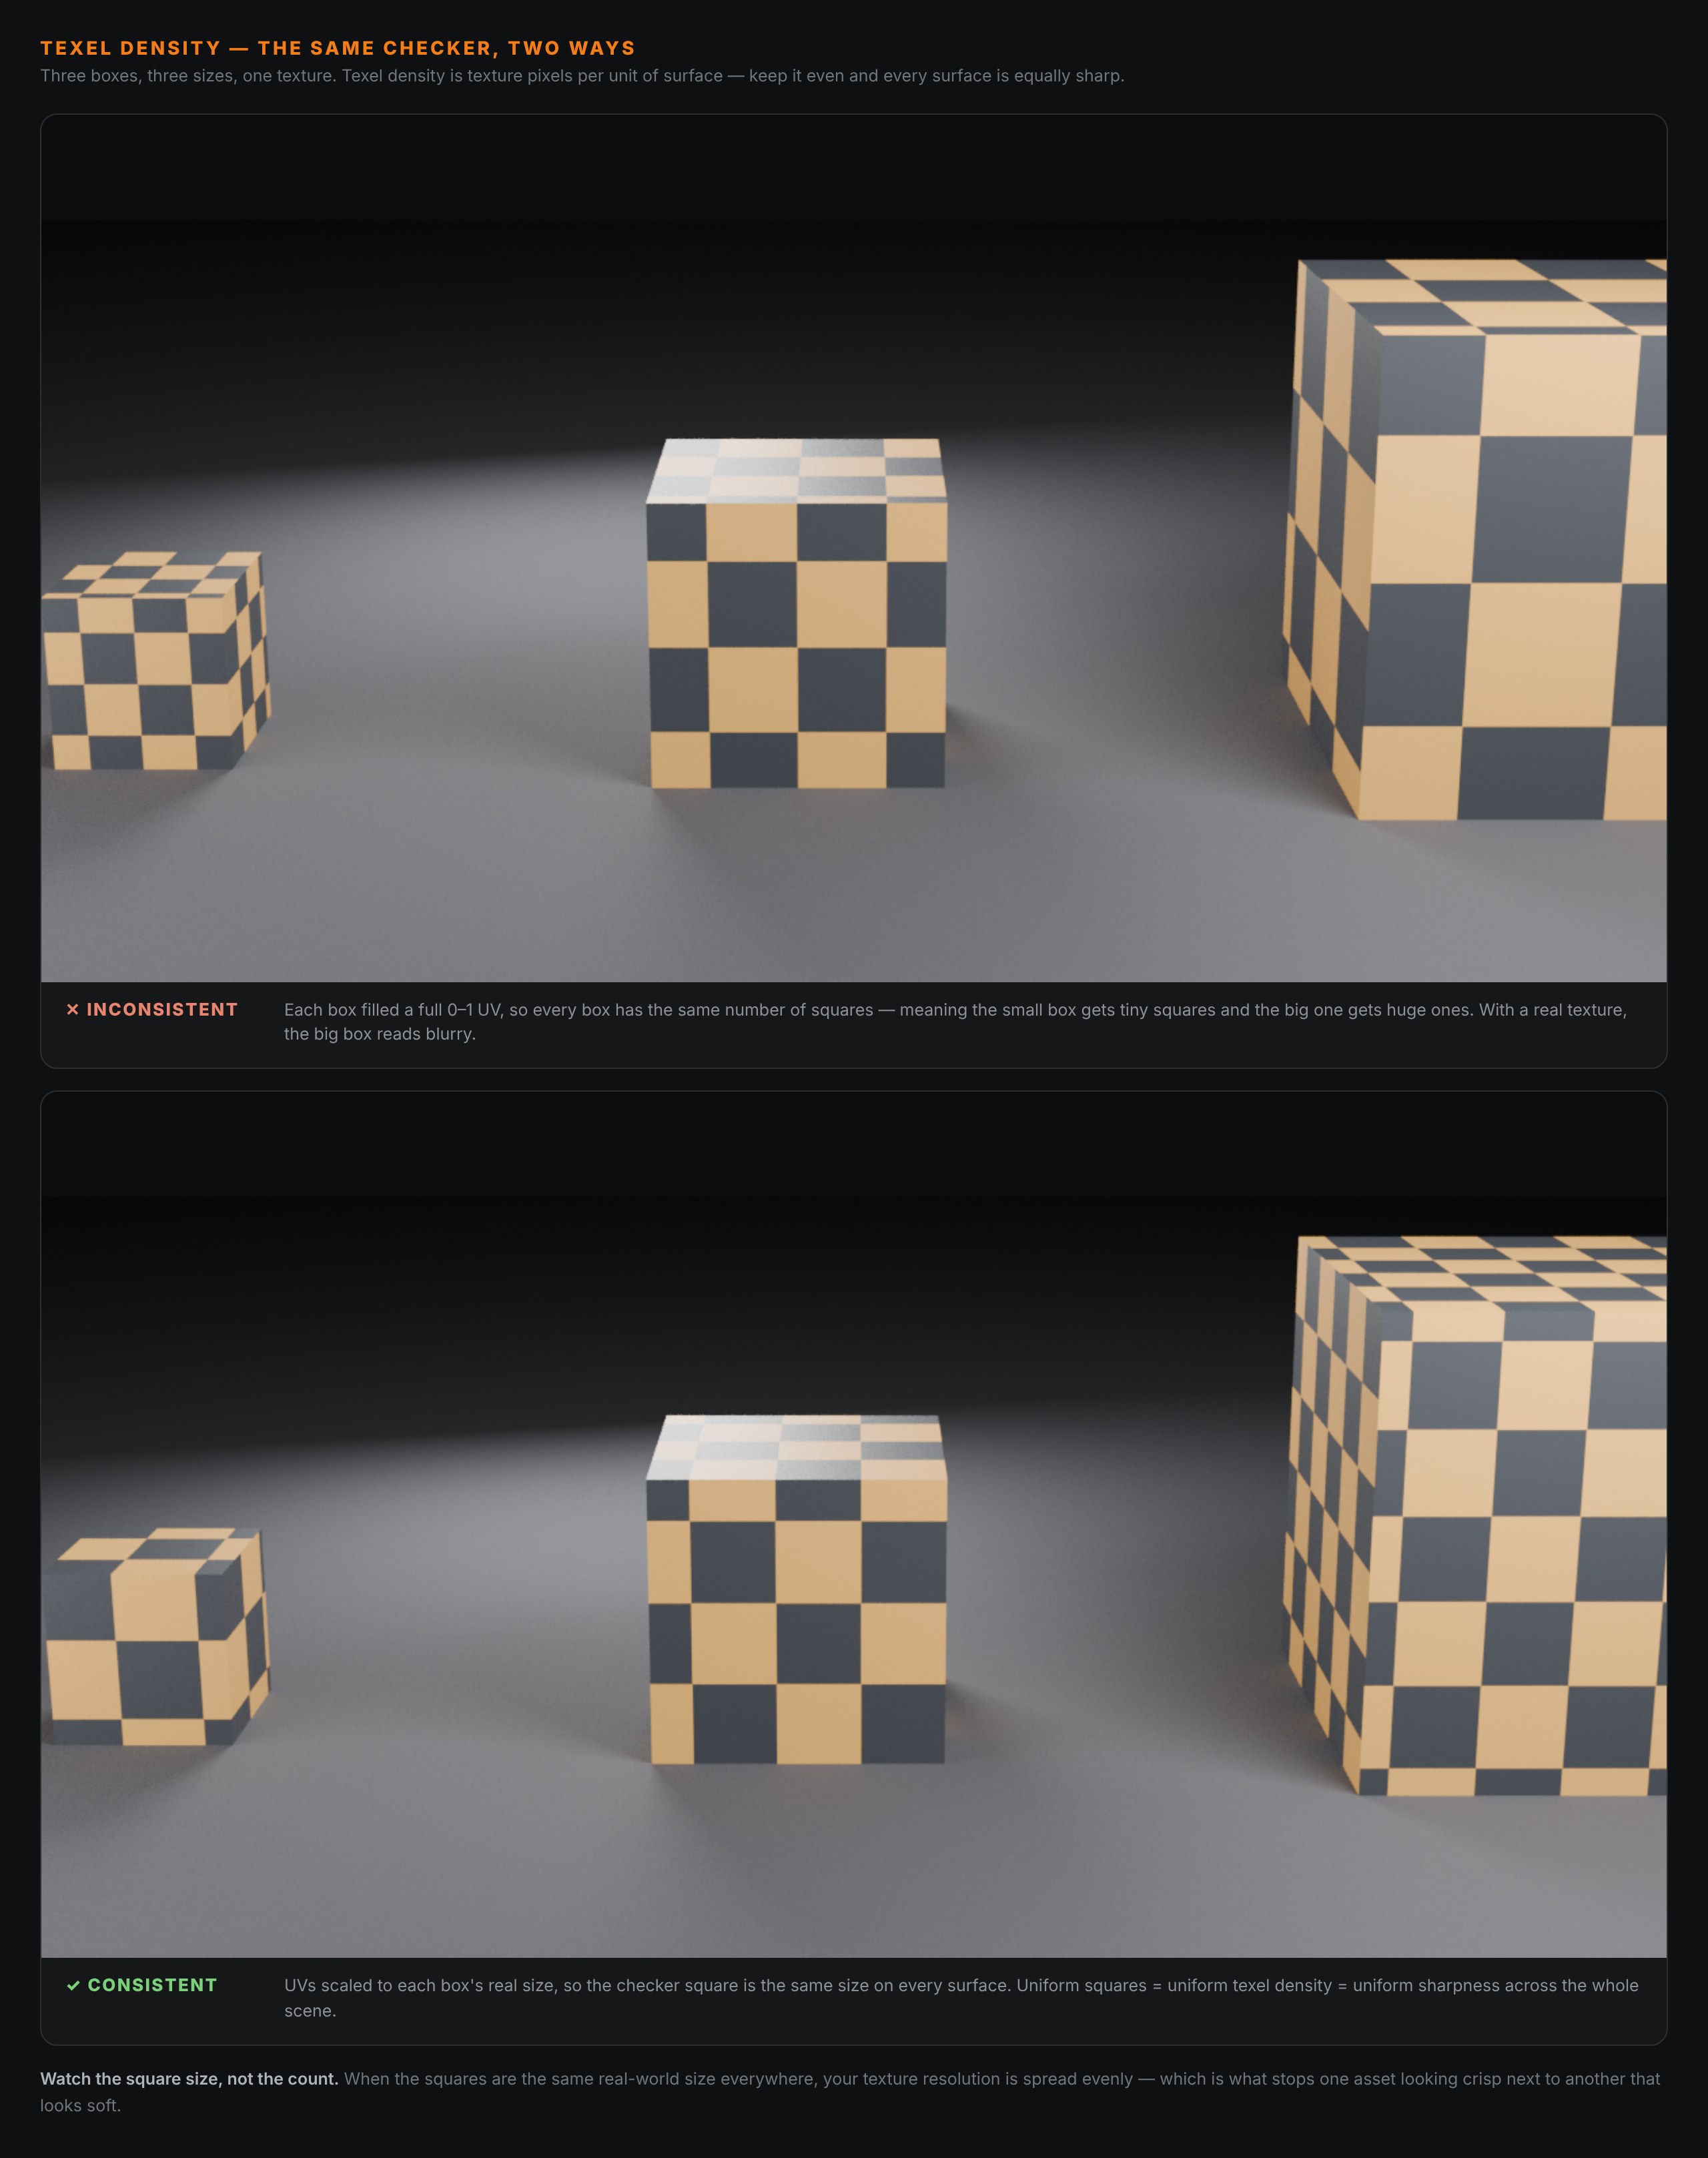
Texel density is the one thing separating a scene that reads as professional from one that reads as "a beginner made this," and it is almost never about the textures themselves.
🧮 What It Actually Is
Texel density is texture pixels per unit of surface — how many texels (texture pixels) land on each centimetre or metre of your model. It is measured in something like px/cm or px/m.
When it is consistent across your assets, every surface gets the same share of texture resolution, so everything is equally sharp. When it is not, some surfaces are crammed with pixels and others are starved — and the starved ones look blurry no matter how good the texture is.
Look again at the image. Both rows use the exact same checker. In the top row every box fills a full UV square, so they all have the same number of checks — which means the big box's checks are huge and the small box's are tiny. In the bottom row the checks are the same real-world size on every box. That second one is consistent texel density, and it is the one that looks right.
The rule you can hold onto: watch the square size, not the square count. Same size everywhere means even density.
😬 Why It Matters More Than It Sounds
Mismatched sharpness reads as amateur. A crisp crate sitting next to a blurry wall is the single most common tell of inexperienced environment art. Nobody can name what is wrong, but everyone feels it.
It wastes your texture budget. Resolution spent over-detailing a surface nobody gets close to is resolution stolen from a hero surface that needed it. Even density is also efficient density.
Engines and teams expect it. On any real project, texel density is a standard everyone on the team hits, so that assets built by different people cut together seamlessly. Ignoring it is fine alone; it does not survive contact with a pipeline.
👁️ How To See It: The Checker
You do not eyeball texel density on your final textures — you check it with a checker or UV grid texture, exactly like the image above.
Assign a checker material to everything, and look at the squares across all your surfaces:
- Same size everywhere → even density. Good.
- Squares stretched into rectangles → the UVs are distorted; the unwrap needs fixing.
- Squares much bigger on one object than another → inconsistent density; scale the UVs.
It is the fastest diagnostic in texturing, and it catches distortion and density problems in the same glance. Keep a checker material in your startup file.
📐 Setting It In Blender
The concept: an object's texel density is set by how big its UV islands are relative to its real-world size. A bigger object needs proportionally bigger UVs to hold the same density. The classic mistake — the top row of the image — is unwrapping every object to fill the 0–1 UV space regardless of how big it is.
Without an add-on: assign the checker, then scale each object's UV islands up or down until the squares match across everything. Slow, but it builds the instinct, and it is the same island-scaling muscle that UV unwrapping already trains.
With an add-on: TexTools (free) is the standard. It reads out an object's texel density as a number and sets it to a target with one click, so you can make every asset in a scene exactly, say, 10.24 px/cm instead of matching by eye. For any serious environment work it is worth installing on day one.
🔢 The Standard Numbers
Density targets depend on how close the player gets and how important the asset is. Common game values, for a 1024px texture:
- Hero / first-person assets: high density — often 10.24 px/cm (a 1024px texture covering 1 metre), sometimes more.
- Standard environment assets: 5.12 px/cm is a very common middle ground.
- Background / distant assets: 2.56 px/cm or lower — nobody gets close, so the resolution would be wasted.
The exact numbers vary by studio and project; what matters is that you pick a value and hold everything in a given tier to it, so assets in the same space match. Consistency beats any particular number.
🧱 It Rests On The Layers Below
Texel density is the top of a stack, and it is only as good as what holds it up.
You cannot set even density on an unwrap that is distorted, and you cannot unwrap cleanly on triangle-soup topology. So the real order is: clean topology, then a clean unwrap, then even texel density on top. Skip a layer and the one above it wobbles. This is why texel density problems so often turn out to be UV problems, which turn out to be topology problems — the symptom is at the top, the cause is usually further down.
🧰 The Thirty-Second Check
- Assign a checker material to every object in the scene.
- Look at the square size. Same across everything? Density is even.
- Spot the outliers — an object with much bigger or smaller squares is the one dragging your scene's consistency down.
- Scale its UVs (or set a target with TexTools) until it matches.
That is the entire workflow. It takes a minute and it is the difference between a scene that hangs together and one that quietly looks off.
🎯 The Underlying Idea
Texel density is invisible until you compare two things — and that is exactly why it matters. A single asset in isolation always looks fine. The problem only appears in a scene, where one surface's sharpness sits next to another's, and the mismatch is what the eye catches even when the viewer cannot say why.
So it is a discipline of consistency rather than quality. You are not making any one thing better; you are making everything agree. And consistency, across a whole scene built from many separate pieces, is most of what "looks professional" actually means — which is also why clean, even texel density is one of the quietest but clearest signals a portfolio sends a studio.
Read next: UV Unwrapping in Blender, Without the Panic — texel density is set on the UVs, so this is the layer directly underneath it.
Building a scene where the pieces do not quite sit together and you cannot say why? Book a free intro call →. Texel density is one of those things that is obvious the moment someone points at the checker on your screen, and invisible until they do.
Newsletter
Get more tips like this
Short, practical Blender guides for beginners — straight to your inbox. No spam. Unsubscribe any time.